I was having a rough day when I realized I couldn’t access Disk Management on my Windows 11 computer. It seemed like a minor issue at first, but it quickly turned into a major headache. I needed to manage my partitions and check on the state of my drives, but every time I tried to open Disk Management, I was met with an error message or, even worse, nothing happened at all. I was quite frustrated and worried about whether this issue would lead to more significant problems down the line. I knew I had to tackle this issue head-on, so I began researching and testing potential solutions.
My first step was to understand why Disk Management wasn’t opening. I searched through forums and tech blogs and learned that this problem could be due to several reasons: corrupted system files, a service not running properly, or even conflicts with other applications. With this in mind, I decided to start with the most straightforward solution: restarting my computer. Sometimes, a simple reboot can resolve temporary glitches. However, despite restarting, Disk Management remained inaccessible.
Next, I delved into the realm of system file corruption. I ran the System File Checker tool, a built-in utility that scans for and repairs corrupted system files. To do this, I opened Command Prompt with administrative privileges. I typed sfc /scannow and let the tool do its work. It took a few minutes, and afterward, it reported that it had found and repaired some issues. I hoped this would fix the problem, but after another attempt to open Disk Management, I was still out of luck.
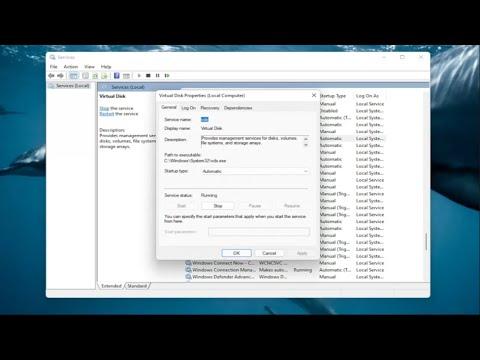
Determined not to give up, I decided to check the status of the Virtual Disk Service, which is essential for Disk Management to function correctly. I accessed the Services app by typing services.msc into the search bar and hit Enter. In the list of services, I located “Virtual Disk” and made sure it was running. To my relief, it was running, but I noticed that the service was set to “Manual” instead of “Automatic.” I changed it to “Automatic” and restarted my computer again. Despite my efforts, Disk Management was still inaccessible.
Not one to be easily discouraged, I turned my attention to potential conflicts with other software. I recently installed a new application, and I suspected it might be interfering with Disk Management. I decided to boot my computer into Safe Mode, which starts Windows with only essential drivers and services. This can help determine if third-party software is causing the issue. To enter Safe Mode, I went to Settings, then to System, and selected Recovery. From there, I chose “Restart now” under Advanced startup. After my computer restarted, I selected “Troubleshoot,” then “Advanced options,” and finally “Startup Settings.” I clicked “Restart” and pressed the F4 key to boot into Safe Mode.
In Safe Mode, I attempted to open Disk Management again. To my disappointment, the problem persisted. This led me to consider that there might be a deeper issue with Windows itself. I decided to use the DISM (Deployment Imaging Service and Management Tool) utility, which can fix Windows system image issues. I opened Command Prompt with administrative privileges once more and ran the command DISM /Online /Cleanup-Image /RestoreHealth. This process took some time, but once it was complete, I restarted my computer and checked Disk Management once again. Unfortunately, I was still unable to access it.
Realizing that my situation required more drastic measures, I considered performing a System Restore. This would roll back my system to a previous state before the problem started, which could potentially fix the issue. I accessed System Restore through the Recovery options, but I discovered that there were no restore points available. It seemed like I was running out of options.
Finally, I resorted to repairing Windows using the installation media. I downloaded the Windows 11 installation media from Microsoft’s website and created a bootable USB drive. I booted my computer from this USB drive and selected “Repair your computer” instead of “Install now.” From there, I navigated to “Troubleshoot” and then to “Advanced options.” I chose “Startup Repair” to see if it could fix the problem automatically. After the repair process, I rebooted my computer.
To my relief, Disk Management finally opened successfully. It turned out that the issue was due to some underlying corruption that these repair tools had resolved. I was able to manage my disks and partitions as needed. While this process was time-consuming and sometimes frustrating, it was ultimately effective in resolving the issue.
Looking back, I learned the importance of methodically troubleshooting problems and not giving up too soon. Sometimes, a combination of different solutions is required to fix an issue completely. In this case, a series of steps from simple checks to more advanced repairs finally got Disk Management up and running. It was a reminder that patience and persistence are crucial when dealing with technical problems.