I recently encountered an issue with my computer’s performance that led me to explore the state of the TRIM command on my SSD. Over time, I had noticed that my system’s speed seemed to be deteriorating, and despite trying various troubleshooting methods, the problem persisted. After some research, I learned that the TRIM command plays a critical role in maintaining the performance of solid-state drives (SSDs) by informing the SSD which blocks of data are no longer considered in use and can be wiped internally. This process is crucial for ensuring that the SSD continues to operate efficiently and doesn’t become bogged down by unnecessary data.
Initially, I wasn’t entirely sure if TRIM was enabled on my SSD, so I decided to check its status on my Windows 11 system. Fortunately, Windows 11 has built-in tools that make it relatively straightforward to verify whether TRIM is functioning correctly. Here’s a step-by-step account of how I checked the TRIM status on my SSD.
First, I began by opening the Command Prompt with administrative privileges. To do this, I clicked on the Start menu and typed “Command Prompt” into the search bar. Once the Command Prompt app appeared in the search results, I right-clicked on it and selected “Run as administrator.” This was crucial because checking system settings and performing certain tasks requires elevated privileges to access and modify the system’s internals.
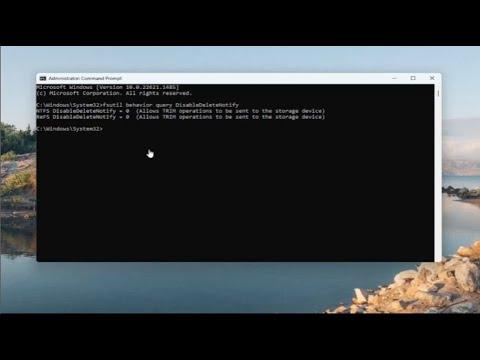
With the Command Prompt window open, I entered the command fsutil behavior query DisableDeleteNotify and pressed Enter. This command is used to query the status of TRIM in the Windows operating system. If TRIM is enabled, the response should indicate that TRIM notifications are not disabled.
Upon executing the command, I received a response that looked like this: DisableDeleteNotify = 0. This result was good news because it confirmed that TRIM was enabled on my SSD. In Windows, a value of 0 means that TRIM is indeed active and functioning correctly. Conversely, if the result had been DisableDeleteNotify = 1, it would have indicated that TRIM was disabled, and I would have needed to take further steps to enable it.
Knowing that TRIM was enabled was a relief, but I wasn’t completely done yet. I wanted to make sure that everything was working as it should, so I decided to check my SSD’s health and ensure that there were no underlying issues affecting its performance. For this, I turned to a third-party SSD management tool that provided detailed information about the drive’s status, including its health and performance metrics.
I downloaded and installed a reputable SSD management utility, which allowed me to monitor various aspects of my SSD. The software showed me that my SSD’s health was in good condition, and the TRIM function was indeed being executed periodically as expected. This additional verification provided me with confidence that my SSD was not only enabled with TRIM but also operating optimally.
Reflecting on the entire process, I realized how important it is to periodically check and maintain the health of your SSD. While the TRIM command is generally enabled by default in Windows 11, it’s always a good practice to verify its status, especially if you’re experiencing performance issues. Regular checks can prevent potential slowdowns and extend the lifespan of your drive.
In conclusion, checking if TRIM is enabled on your SSD in Windows 11 is a straightforward process that involves using the Command Prompt to query the system settings. By following these steps, I was able to ensure that TRIM was active, which reassured me about the health and performance of my SSD. It’s an essential maintenance step that anyone with an SSD should perform to keep their system running smoothly and efficiently.