To enable and view printed document history in Windows 11, you’ll need to follow several steps. These steps involve enabling the built-in print service that logs print jobs and then accessing this log to view your document history.
First, you should ensure that the print service is active. By default, Windows 11 has a print service that logs details about print jobs. To make sure this service is enabled, you’ll need to access the Print Service Properties.
1. Press `Win + R` to open the Run dialog box. Type `services.msc` and press Enter. This opens the Services window where you can manage various system services.
2. In the Services window, scroll down and find the “Print Spooler” service. This service is responsible for managing print jobs. Ensure that this service is running. If it’s not running, right-click on it and select “Start.” If it’s already running, you can leave it as is.
3. Next, you need to access the print service settings to ensure that print logging is enabled. This involves configuring the local group policy settings.
4. Press `Win + R` again to open the Run dialog, type `gpedit.msc`, and hit Enter. This opens the Local Group Policy Editor.
5. In the Local Group Policy Editor, navigate to the following path: Computer Configuration > Administrative Templates > Printers.
6. Look for a policy named “Enable Print History.” Double-click on it to open its properties. If the setting is set to “Not Configured,” change it to “Enabled.” Click “Apply” and then “OK” to confirm the changes. This setting ensures that Windows will log print jobs.
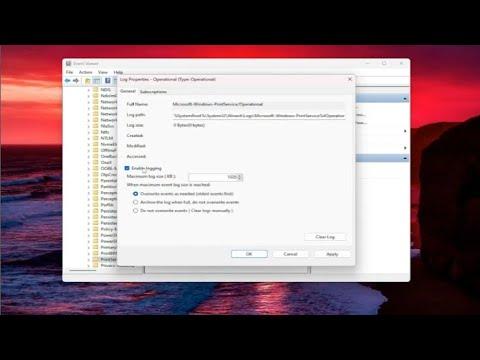
7. Once you have enabled print history, you need to ensure that the print job logs are actually being stored. You can access these logs through the Event Viewer.
8. To open the Event Viewer, press `Win + R`, type `eventvwr.msc`, and press Enter. This will open the Event Viewer application.
9. In the Event Viewer, navigate to the following path: Windows Logs > Application. Here, you’ll see a list of application logs, including those related to print jobs.
10. To filter and find specific print-related events, click on “Filter Current Log” in the Actions pane on the right side of the Event Viewer. In the filter window, look for the source named “Microsoft-Windows-PrintService.” This is where print job events are logged.
11. You can also view print history by using the “Print Management” console. To open this, press `Win + R`, type `printmanagement.msc`, and press Enter. This console provides a more user-friendly interface for managing printers and viewing print jobs.
12. In the Print Management console, expand the “Print Servers” node, select your local print server, and then click on “Printers.” Here you will see a list of printers and their associated print jobs.
13. Click on a printer to view its print queue and history. The print queue will show recent print jobs and their statuses, allowing you to view what has been printed recently.
14. If you need more detailed history beyond what is immediately visible, you might need to use third-party tools or applications designed for more comprehensive print tracking. These tools can offer enhanced features and more detailed logs if required.
15. Lastly, always remember to periodically review and manage your print logs to ensure you’re not consuming excessive disk space. Over time, the log files can grow large if not managed properly.
By following these steps, you can enable and view printed document history in Windows 11, allowing you to keep track of your print jobs and manage your printing tasks more effectively.