To enable or disable TRIM support for Solid State Drives (SSDs) in Windows 11, follow these steps. TRIM is a command used to help maintain the performance and longevity of SSDs by allowing the operating system to inform the SSD which blocks of data are no longer in use and can be wiped internally. Enabling TRIM can help with the overall performance and efficiency of your SSD, while disabling it may be considered in specific scenarios, such as when using certain types of RAID configurations.
First, open the Command Prompt with administrative privileges. To do this, right-click on the Start menu button and select “Windows Terminal (Admin)” or “Command Prompt (Admin)” from the menu. This will launch the Command Prompt with the necessary administrative rights to execute the required commands.
Once you have the Command Prompt open, you need to check if TRIM is currently enabled or disabled on your system. Type the following command and press Enter:
“`
fsutil behavior query DisableDeleteNotify
“`
The system will return a value of `0` or `1`. If the result is `0`, TRIM is enabled. If the result is `1`, TRIM is disabled.
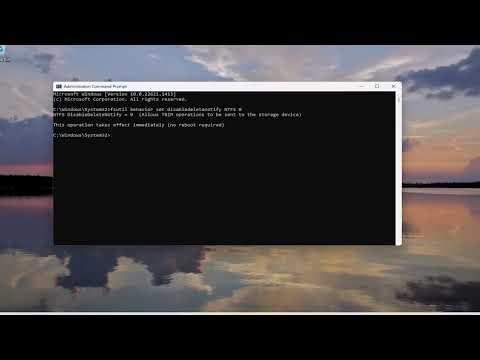
If you find that TRIM is disabled and you want to enable it, type the following command and press Enter:
“`
fsutil behavior set DisableDeleteNotify 0
“`
This command instructs Windows to allow TRIM commands to be sent to the SSD. After executing the command, it’s a good practice to reboot your system to ensure that the changes take effect.
Conversely, if you decide to disable TRIM—perhaps for compatibility reasons or due to the specifics of your RAID configuration—you can do so by typing:
“`
fsutil behavior set DisableDeleteNotify 1
“`
After running this command, TRIM support will be disabled. As with enabling TRIM, it’s recommended to restart your computer to apply these changes effectively.
Understanding when to enable or disable TRIM is important. Most modern SSDs and Windows configurations benefit from having TRIM enabled because it helps maintain performance over time by preventing performance degradation associated with data deletion. However, some users might have specific use cases where disabling TRIM is preferable, such as when using certain RAID configurations or working with SSDs in specific environments that don’t support TRIM commands effectively.
To summarize, enabling or disabling TRIM support in Windows 11 involves checking the current status with a simple command and then using another command to change the status as needed. Always remember to execute these commands with administrative privileges and reboot your system to ensure changes take effect. TRIM is an important feature for maintaining SSD performance and longevity, and its management should be done carefully based on your specific needs and system configuration.