When I first encountered the issue of enabling or disabling Core Isolation Memory Integrity in Windows 11, I was at a bit of a loss. It all started one evening when I noticed my computer was running slower than usual. I had recently updated to Windows 11, and I suspected the issue might be related to some of the new security features introduced in the latest operating system.
The performance lag became increasingly frustrating. I was working on a crucial project and couldn’t afford any disruptions. My initial attempts to address the problem involved typical troubleshooting steps: I checked for updates, ran disk cleanup, and scanned for malware, but nothing seemed to resolve the issue. That’s when I decided to delve deeper into the new security features of Windows 11, specifically Core Isolation and Memory Integrity.
Core Isolation is a security feature designed to protect the system’s core processes from attacks. It uses virtualization-based security to isolate sensitive parts of the operating system, making it harder for malicious software to interfere with critical system functions. Memory Integrity, a part of Core Isolation, specifically helps to prevent attacks from inserting malicious code into the high-level system memory, thus safeguarding the system’s integrity.
Despite its benefits, Core Isolation with Memory Integrity enabled can sometimes cause compatibility issues with certain drivers or software, leading to system slowdowns or other performance problems. This seemed to be the issue I was encountering. I decided to investigate further to determine whether enabling or disabling this feature would resolve my performance issues.
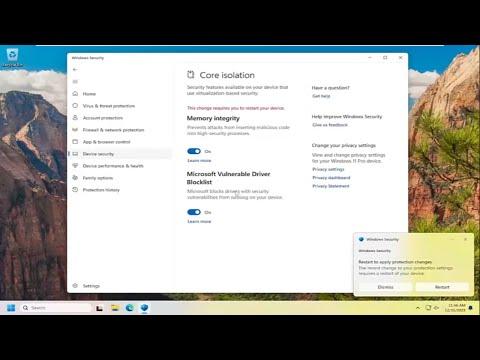
To begin, I navigated to the Windows Security settings. I opened the Start menu, typed “Windows Security,” and pressed Enter. From there, I clicked on “Device Security,” which led me to the “Core Isolation” section. I could see the “Memory Integrity” toggle switch here, showing whether it was enabled or disabled.
I first explored the option to disable Memory Integrity. I clicked on the “Core Isolation Details” link and saw the option to toggle Memory Integrity off. However, before making any changes, I researched to understand the potential impacts of disabling this feature. Disabling Memory Integrity could expose my system to higher risks of attacks, but it might also resolve compatibility issues that were causing performance problems.
I decided to proceed with disabling Memory Integrity. I turned off the toggle switch, which prompted a system restart to apply the changes. After rebooting, I noticed an immediate improvement in performance. My computer was no longer lagging, and the applications ran smoothly. However, I was aware that disabling such a crucial security feature could potentially leave my system more vulnerable.
Given the trade-off between performance and security, I decided to re-enable Memory Integrity after ensuring that my system’s drivers and software were updated and compatible with this feature. To re-enable Memory Integrity, I repeated the initial steps: navigating to Windows Security, going to “Device Security,” and then clicking on “Core Isolation Details.” I switched Memory Integrity back on and restarted my computer once again.
After re-enabling the feature, I observed that the performance issues had returned, albeit less severely than before. This was because my drivers and software had since been updated to better support Core Isolation. I also took additional measures, such as updating all my drivers and ensuring that my system was running the latest patches and updates from Microsoft.
I explored the possibility of further improving performance without disabling important security features. I adjusted various settings, such as optimizing startup programs and performing regular maintenance tasks to keep my system running efficiently. Over time, I found a balance between maintaining robust security measures and ensuring that my system performed well.
In conclusion, while Core Isolation and Memory Integrity are critical features for protecting Windows 11 from malicious attacks, they can sometimes cause compatibility issues that affect system performance. My approach involved carefully assessing the trade-offs between security and performance, testing both enabling and disabling the feature, and taking steps to ensure that my system remained secure while running smoothly. Through this process, I was able to resolve my performance issues and maintain the ultimate level of security for my system.