I recently encountered a frustrating problem with my Windows 11 laptop that seemed to come out of nowhere. One day, I was working on a project when I noticed that I couldn’t connect to my WiFi network. My laptop was displaying a “Can’t Connect to This Network” error message, and despite my attempts to troubleshoot the issue, the problem persisted.
At first, I tried the usual fixes that worked in the past, like restarting my laptop and router. However, neither of these steps resolved the issue. I then decided to delve deeper into the problem, as it was becoming clear that this wasn’t just a temporary glitch.
The first thing I did was check my WiFi settings. I opened the Network & Internet settings from the Start menu and selected the WiFi option. I made sure that WiFi was turned on and that my network was visible. Sometimes, simply toggling the WiFi off and on again can fix connectivity issues, but in this case, it didn’t help.
Next, I decided to run the built-in network troubleshooter. To do this, I went to Settings, then System, and clicked on Troubleshoot. From there, I selected Other troubleshooters and found the Network Adapter troubleshooter. Running this troubleshooter was helpful because it identified a potential issue with the network adapter and provided a solution. It suggested resetting the network adapter, which seemed like a viable option.
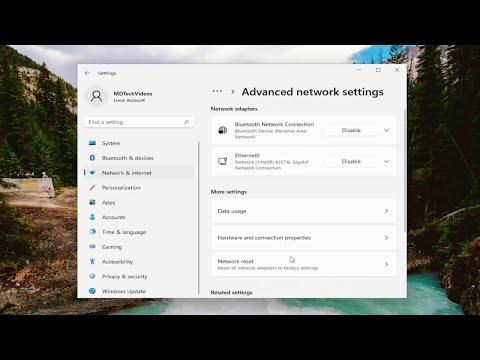
I followed the steps to reset the network adapter. This involved going back to the Network & Internet settings and selecting Advanced network settings. There, I clicked on Network reset and followed the prompts to reset my network settings. After the reset was complete, my laptop rebooted automatically.
After the restart, I checked my WiFi connections again. Unfortunately, the problem persisted. I realized that I needed to delve deeper into the issue. I decided to check for driver updates for my network adapter. I went to Device Manager, located Network adapters, and found my WiFi adapter. Right-clicking on it, I selected Update driver and followed the prompts to search for updates automatically. The system found an updated driver and installed it.
Once the driver update was complete, I restarted my laptop once more and tried connecting to my WiFi network. This time, I was able to connect without any issues. The driver update seemed to be the ultimate solution to the connectivity problem.
Despite resolving the issue, I wanted to make sure that I understood what went wrong in case it happened again. I researched online and found that network problems can often be caused by outdated or corrupt drivers, network settings conflicts, or issues with the router itself. I learned that keeping drivers up to date and periodically checking network settings can help prevent similar issues in the future.
In summary, fixing the “Can’t Connect to This Network” error on Windows 11 required a combination of resetting network settings, running the network troubleshooter, and updating the network adapter driver. Each step was crucial in diagnosing and resolving the problem. Through this experience, I gained valuable insight into troubleshooting network issues, and I’m now better prepared to handle any future connectivity problems that may arise.