I recently faced an issue that I hadn’t anticipated. While working on my Windows 11 PC, I noticed that my system was running hotter than usual. Despite my efforts to monitor and manage the temperature, the problem persisted. In an attempt to address the overheating issue, I decided to adjust the power settings to better control the system cooling. However, when I navigated to the Power Options in the Control Panel, I was baffled to find that the ‘System Cooling Policy’ option was missing. This feature was crucial for adjusting whether my system’s cooling policy was set to active or passive, and without it, I felt powerless to address the overheating.
After a bit of searching and experimenting, I discovered that the absence of the ‘System Cooling Policy’ in the Power Options is a common problem that many users face. This setting typically allows users to configure how their system’s cooling is managed based on their power plan. For example, it can determine whether the system should increase fan speed or adjust the CPU performance to cool down. The absence of this option can be frustrating, especially when you need to ensure your PC is running efficiently and not overheating.
To resolve this issue, I followed a series of steps that helped me restore the ‘System Cooling Policy’ option in the Power Options menu. Here’s a detailed guide on how I fixed the problem:
Firstly, I checked if my system was up to date. Sometimes, missing options or features can be attributed to outdated system files. I went to Settings, clicked on Update & Security, and then selected Windows Update. After checking for updates, I made sure that all pending updates were installed and the system was restarted.
Next, I ensured that all necessary drivers, especially the chipset and graphics drivers, were up to date. I visited the manufacturer’s website for my motherboard and graphics card to download the latest drivers. Updating drivers can sometimes resolve issues related to system settings and power options.
After updating the drivers, I went back to the Control Panel and checked the Power Options again. Unfortunately, the ‘System Cooling Policy’ was still missing. It became clear that this might be related to the specific power plan I was using. I decided to create a new power plan to see if that would solve the problem.
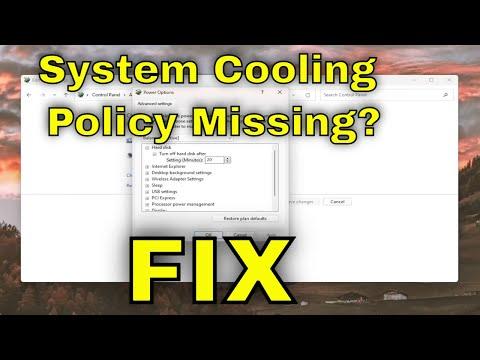
I navigated to the Control Panel, selected Hardware and Sound, and then Power Options. I clicked on “Create a power plan” on the left sidebar. I chose the Balanced plan as a base and gave it a name. Once the new power plan was created, I selected it and clicked on “Change plan settings.” Then, I clicked on “Change advanced power settings.”
In the advanced settings menu, I expanded the “Processor power management” section and looked for the ‘System Cooling Policy’ option. To my relief, it was now visible. I adjusted the cooling policy to my preference, setting it to ‘Active’ to ensure that the system fan would run faster to cool down the system. I saved the changes and closed all the windows.
Even after creating a new power plan and finding the ‘System Cooling Policy,’ I was curious about why this issue had occurred in the first place. I did some research and discovered that the absence of this setting could be due to several reasons. Sometimes, specific hardware configurations or BIOS settings could affect the visibility of certain power options. For instance, if the motherboard or BIOS doesn’t support advanced cooling features, the ‘System Cooling Policy’ might not appear in the Power Options.
In my case, I decided to check the BIOS settings. I rebooted my PC and entered the BIOS by pressing the designated key (usually F2, F10, or DEL) during startup. I navigated to the hardware monitoring or power management section and looked for any settings related to cooling or fan control. I made sure that the options related to system cooling and fan control were enabled.
After verifying the BIOS settings and making necessary adjustments, I rebooted the PC and checked the Power Options once again. The ‘System Cooling Policy’ option was still present and working as intended.
Finally, I realized that the problem could also be related to system corruption or misconfigurations within Windows itself. To address this, I ran the System File Checker (SFC) and Deployment Imaging Service and Management Tool (DISM) commands. I opened Command Prompt as an administrator and typed sfc /scannow to scan and repair any corrupted system files. After that, I ran DISM /Online /Cleanup-Image /RestoreHealth to fix any issues with the system image.
These steps helped to ensure that my Windows installation was not the cause of the missing settings. After completing all these steps, I found that my system was running cooler and more efficiently. The ‘System Cooling Policy’ option was now available and functioning properly, allowing me to manage my system’s cooling more effectively.
In summary, dealing with the missing ‘System Cooling Policy’ in Windows Power Options involved updating system components, creating a new power plan, checking BIOS settings, and repairing system files. By following these steps, I managed to restore the missing option and ensure that my PC was running smoothly and efficiently.