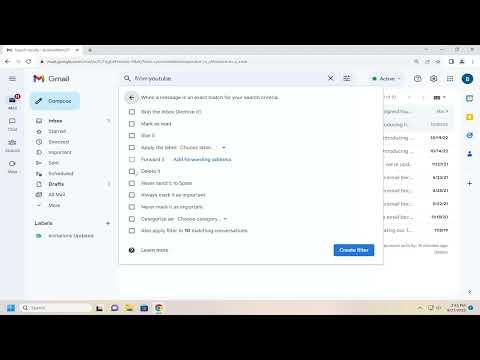
When I first started using Gmail, managing my ever-growing inbox became a real challenge. The sheer volume of emails from different sources made it hard to keep track of important messages. That’s when I decided to delve into Gmail’s filtering options. These filters can automatically sort, label, and even delete emails based on criteria I set, which significantly streamlined my email management process.To create a filter in Gmail, the first step I took was to access the Gmail website and log into my account. Once I was in, I noticed the gear icon in the upper-right corner of the screen, which led me to the “See all settings” option. Clicking on this took me to a new page with multiple tabs, including one labeled “Filters and Blocked Addresses.” I selected this tab to get started with creating my filters.On the “Filters and Blocked Addresses” tab, I found an option labeled “Create a new filter.” Clicking on this opened a window where I could specify the criteria for the filter. I could enter details such as the email address of the sender, specific words in the subject line or body of the email, and even set rules based on the size of the email or its attachments. For instance, if I wanted to filter emails from a particular sender, I would enter that sender’s email address in the “From” field. This would ensure that any email from that sender would be subject to the rules I set up in the filter.After entering the necessary criteria, I clicked on the “Create filter” button. This brought me to a new window where I could choose what actions Gmail should perform on emails that meet the filter criteria. I could select options such as applying a specific label, marking the email as read, archiving it, or even forwarding it to another email address. In my case, I found it useful to apply a label to certain emails so that they would be automatically organized into specific categories, such as “Work” or “Personal.”Another helpful option was the “Delete it” action. If I wanted to automatically get rid of emails from certain senders or with specific keywords that I deemed irrelevant or spammy, I could select this option. This helped me keep my inbox clean and focused on messages that mattered to me.Once I had chosen the actions, I clicked on “Create filter” again to finalize the process. Gmail then applied the filter to existing emails in my inbox as well as to any future emails that matched the criteria. I found this feature particularly useful because it meant I didn’t have to manually sort through old emails; the filter did it for me automatically.Editing a filter was just as straightforward. Whenever I wanted to make changes to an existing filter, I returned to the “Filters and Blocked Addresses” tab in the settings. There, I saw a list of all the filters I had created. Next to each filter, there was an “Edit” option. Clicking on this allowed me to adjust the criteria or the actions associated with the filter. For example, if I wanted to change the label applied by a filter or update the email address criteria, I could do so here.I could also choose to apply the changes to emails already in my inbox, which was helpful if I had updated the filter criteria and wanted those changes to take effect retroactively. After making the necessary adjustments, I clicked “Update filter” to save my changes.Deleting a filter was similarly easy. On the “Filters and Blocked Addresses” tab, I could find the filter I wanted to remove and select the “Delete” option next to it. This would prompt Gmail to remove the filter and stop applying its rules to future emails. It was a handy way to clean up filters I no longer needed or had become obsolete over time.One thing I discovered while using filters was their ability to interact with Gmail’s search operators. For example, I could create filters based on specific keywords or phrases, and even combine multiple criteria. This made my filters highly customizable and tailored to my particular needs.Overall, mastering Gmail filters was a game-changer for my email management. It not only helped me stay organized but also saved me a considerable amount of time by automating the sorting and handling of my emails. With the ability to create, edit, and delete filters, I felt much more in control of my inbox. It’s a powerful tool that I highly recommend to anyone struggling with a cluttered email account.Could you clarify if you want a comprehensive guide on using Gmail filters, or are there specific aspects you’d like to delve into more deeply?
Gmail: How To Create, Edit and Delete Filters [Guide]