I remember the first time I opened Google Docs to work on a project. It seemed so user-friendly and straightforward, but when I encountered the task of adjusting the margins, I was taken aback. I had been tasked with formatting a lengthy report and needed to make the margins more narrow to fit additional content on each page. It wasn’t immediately obvious how to make these adjustments, and I spent quite a bit of time searching for a solution.
Initially, I thought changing margins in Google Docs would be as simple as clicking a button or using a straightforward menu option. However, I quickly realized that the process was a bit more nuanced. I found myself navigating through menus, searching through various options, and even consulting Google’s help documentation to figure out how to adjust the margins.
Here’s how I finally figured it out, and I hope my experience can help others who find themselves in a similar situation.
To change the margins in Google Docs, the first step is to open the document you want to edit. If you haven’t already done so, go ahead and open Google Docs and either create a new document or open an existing one that you need to format. Once you’re in the document, you need to access the Page Setup menu. This is where the magic happens.
In Google Docs, there isn’t a dedicated button or tool on the toolbar specifically for margin settings, which is why it was a bit confusing at first. Instead, you need to go through the “File” menu. I remember thinking that this couldn’t be the right place, but it actually is. Click on “File” in the upper left corner of your screen. A drop-down menu will appear with various options.
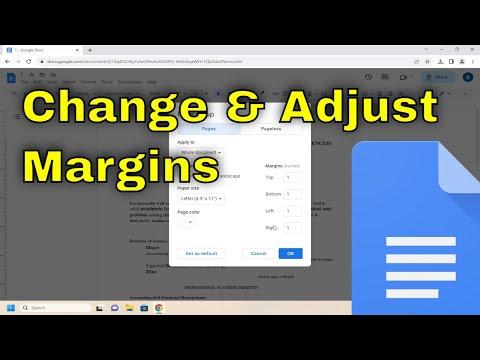
From the “File” menu, look for the “Page setup” option and click on it. This will open a new window or dialog box that displays several settings related to page layout, including margins. The “Page setup” window is where you can make all the necessary adjustments to your document’s layout.
In the “Page setup” dialog box, you’ll see fields for top, bottom, left, and right margins. The default settings are typically set to 1 inch for all margins, but you can adjust these values to fit your needs. To narrow the margins, simply click on the field corresponding to the margin you want to change and enter a smaller number. For example, if you want to reduce the margins to 0.5 inches, type 0.5 into the respective margin fields.
It’s also worth noting that you can enter margins in inches, centimeters, millimeters, or points, depending on your preferences and the document’s requirements. Just make sure that the units are consistent with your needs. Once you’ve entered the desired values, click “OK” or “Apply” to save your changes.
After adjusting the margins, you should see the changes immediately reflected in your document. If the layout still doesn’t look right or if you need further adjustments, you can always return to the “Page setup” menu and tweak the margins until you’re satisfied with the result.
I found that making small incremental changes and reviewing the document after each adjustment helped me get the margins just right. This process of trial and error was a bit time-consuming, but it was worth it to ensure that the document was formatted correctly and looked professional.
In addition to adjusting margins, you might also want to consider other layout settings, such as page orientation and paper size. These settings are also found in the “Page setup” menu and can have a significant impact on the overall appearance of your document. For instance, if you’re working on a presentation or a document that requires a landscape orientation rather than the default portrait orientation, you can switch to landscape mode in the “Page setup” dialog box.
Another useful feature is the ability to set custom margins for specific sections of your document. If you need different margin settings for different parts of your document, you can use section breaks to create separate sections with unique margins. To do this, place your cursor where you want to start a new section, go to the “Insert” menu, select “Break,” and then choose “Section break (next page)” or “Section break (continuous)” depending on your needs. After creating the section breaks, you can adjust the margins for each section individually.
Overall, the process of changing margins in Google Docs may not be immediately intuitive, but once you understand where to find the settings and how to adjust them, it becomes much easier. It’s all about knowing where to look and understanding the options available to you.
Reflecting on my experience, I realize that sometimes the most straightforward tasks can become challenging when you’re unfamiliar with the tools and features at your disposal. However, with a bit of exploration and patience, I was able to overcome the initial confusion and achieve the formatting I needed for my document. I hope my journey can serve as a helpful guide for anyone facing similar challenges with margin adjustments in Google Docs.