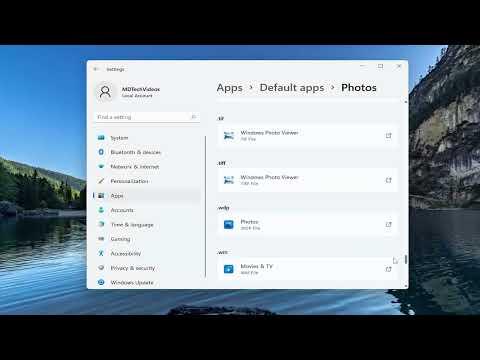
Changing the default photo viewer in Windows 11 can be a simple yet impactful adjustment. I recently went through this process, and I wanted to share how I managed to switch from the default Photos app to another viewer that better suits my needs. The Photos app, while functional, didn’t quite meet my preferences, so I opted for a more versatile tool. Here’s a detailed account of how I made that change.First, I started by opening the Settings app on my Windows 11 PC. To do this, I clicked on the Start menu and then selected the gear icon, which is the shortcut to Settings. Alternatively, I could have used the keyboard shortcut by pressing Win + I. Once I was in the Settings menu, I navigated to the “Apps” section. This is where I found most of the options related to default applications and file associations.In the “Apps” section, there is a submenu called “Default apps.” I clicked on it to access the list of apps that are set to open certain types of files by default. Windows 11 provides an interface where you can set default apps for various file types, protocols, and categories, which is quite handy. Here, I could see a list of different file types and their associated default apps.To change the default photo viewer, I needed to find the file type associated with photos. Generally, this means looking at file extensions like .jpg, .jpeg, .png, and others. I scrolled through the list and found the section labeled “Photo viewer.” By default, this was set to the Photos app, which is why my images would always open in that program.Next, I clicked on the “Photo viewer” section, which brought up a new screen showing the current default app. A list of available apps was displayed, and I had to choose which one I wanted to set as the new default. In my case, I had previously installed a third-party photo viewer that I preferred, so it appeared on this list.I selected the new photo viewer from the list. The system then prompted me to confirm this choice. After confirming, the new app was set as the default for viewing photos. To make sure everything was set correctly, I decided to test it. I opened File Explorer and navigated to a folder containing some images. I right-clicked on one of the image files and selected “Open with” from the context menu. I made sure to check the option to always use this app for files of this type to confirm that my new photo viewer was set as the default.One thing I noticed was that Windows 11 allows you to set defaults for specific file types individually. This means I could customize the settings for .jpg files separately from .png files if needed. I made sure to check all relevant file extensions to ensure consistency across the board.For those who might have multiple photo viewers installed, it’s worth noting that you can switch between them quite easily using the same process. If you find that you prefer another viewer later on, you can follow the same steps to change the default app again. This flexibility is quite useful, especially if you work with different types of image files or if you frequently try out new software.In my experience, making sure that the new photo viewer was properly integrated into the system made a noticeable difference. The new app offered additional features that the default Photos app didn’t, such as advanced editing tools and better support for various image formats. This change has significantly improved my workflow, particularly since I work with a lot of images for both professional and personal projects.Additionally, I took a moment to explore some of the customization options within the new photo viewer itself. Many modern photo viewers come with their own settings and preferences that allow further tweaks to enhance user experience. For instance, I adjusted the settings to ensure that the viewer would open in full-screen mode by default, which is something I find particularly useful when reviewing large sets of images.Overall, the process of changing the default photo viewer in Windows 11 was straightforward. It provided me with more control over how my images are handled and allowed me to use a tool that better fits my requirements. If you’re considering making this change, I would definitely recommend trying it out. It’s a small adjustment that can have a significant impact on how efficiently you work with your photo files.This experience taught me that even small adjustments in system settings can lead to a more personalized and efficient computing experience. By taking the time to choose a photo viewer that suits my needs better, I was able to improve my workflow and make the overall experience more enjoyable.
How to Change the Default Photo Viewer in Windows 11 [Tutorial]