When I first upgraded to Windows 11, I was excited about the new interface and features. However, one thing that initially baffled me was changing my user account picture. I had become accustomed to customizing my account picture in previous versions of Windows effortlessly, but Windows 11 introduced a few changes to the process, making it a bit confusing at first. This guide reflects my journey and how I managed to update my user account picture successfully.
Initially, I tried to navigate through the familiar settings, but I found that the path had changed. My first instinct was to search for the option under “Settings,” which is usually the go-to place for personalization in Windows. I clicked on the Start menu and then selected “Settings,” expecting to find an easy way to change my user picture. However, I noticed that the interface was different from what I was used to. The options seemed to be organized in a new way, which made me realize that I needed to adapt to the updated layout.
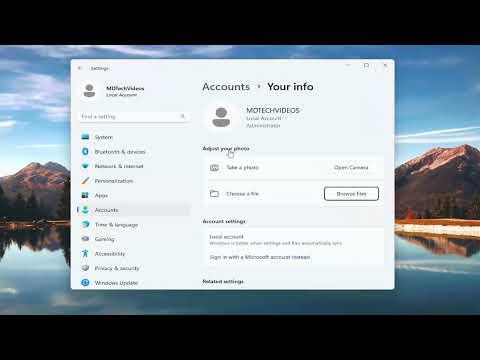
I then decided to dig deeper into the “Accounts” section, thinking that user account settings might be housed there. Once I was in the “Accounts” area, I looked for a subsection related to personalization or profile settings. There, I saw several options related to account security, sign-in options, and other account-related features, but nothing explicitly mentioned changing the user picture.
After some frustration, I decided to search online for guidance. I discovered that Windows 11 had streamlined and restructured some of its settings. This led me to understand that changing the user account picture was indeed possible but required a slightly different approach than before. I learned that I needed to access the “Personalization” settings, which, while still present, were not where I had expected them to be.
To change the user account picture in Windows 11, I had to follow a specific sequence of steps. First, I opened the Start menu again and clicked on “Settings.” From there, I selected “Personalization” from the list of options on the left side. This was a crucial step because “Personalization” is where you can adjust various aspects of your Windows experience, including the account picture.
In the “Personalization” menu, I looked for the “Lock screen” option. Although it might seem unrelated at first glance, this section contains the link to change your account picture. Clicking on “Lock screen,” I found an option labeled “Change picture.” This led me to a new window where I could choose a new image for my account.
I decided to browse through my personal photo library for a suitable image. I chose a picture that I felt represented me well and fit the professional and casual balance I was aiming for. Once I selected the image, I could preview how it would appear as my account picture. Windows 11 allowed me to adjust the image if needed, ensuring that it looked good in the circular format used for account pictures.
After finalizing my selection, I clicked the “Apply” button, and the new picture was immediately set as my account image. I was pleased with how straightforward the process turned out to be, despite my initial confusion. The updated user account picture appeared not only on the lock screen but also on the sign-in screen and other areas where my account image was displayed.
In retrospect, the experience was a learning curve, but it was also a good reminder that adapting to new systems and interfaces is part of the technology journey. The updated process in Windows 11, while different, was actually more integrated with the overall personalization features of the operating system. It reinforced the idea that exploring new features and options can lead to discovering improvements that might not be immediately apparent.
For anyone else facing similar confusion, I would recommend taking the time to explore the new layout and settings in Windows 11. Although it can be disorienting initially, the redesigned interface offers a more cohesive experience once you become familiar with it. The key takeaway is that changing your user account picture is now located within the “Personalization” settings, specifically under the “Lock screen” section, rather than being directly accessible from the “Accounts” settings.
By following these steps, I was able to successfully update my user account picture and make my Windows 11 experience feel more personalized and tailored to my preferences. If you encounter any challenges along the way, remember that exploring and experimenting with the new interface is often the best way to find the solutions you need.