I remember the day I first noticed that my computer seemed to be running slower than usual. Games that had once run smoothly started stuttering, and video editing software began taking forever to render even the simplest of projects. I had recently upgraded to a new graphics card, so I was perplexed as to why my system wasn’t performing as expected. It dawned on me that I might not be fully utilizing the capabilities of my graphics card, and it struck me that I needed to check how much Video RAM (VRAM) I had available. Little did I know that this seemingly simple task would turn into a mini-adventure as I navigated the nuances of Windows 11 and 10 to uncover the details.
I started by diving into the Settings menu, hoping it would provide a straightforward path to the information I needed. I opened the Start menu and clicked on “Settings,” which took me to the new interface. From there, I navigated to the “System” section, and then to “Display.” Scanning through the options, I found “Advanced display settings” and clicked on it. It was here that I hoped to find some clue about my VRAM.
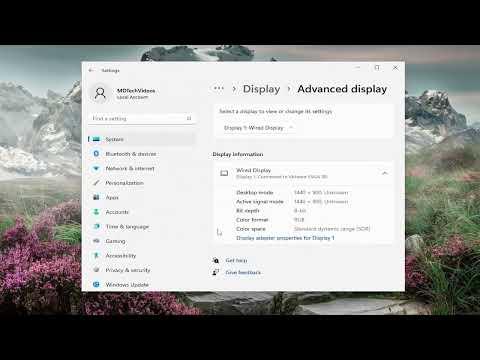
To my surprise, the first screen only offered basic information about the display and resolution, but nothing specific about the VRAM. I then noticed a link that read “Display adapter properties for Display 1,” and I clicked on it, thinking it might lead me to the detailed settings I needed.
This action opened a new window labeled “Display Properties,” where I found multiple tabs. I went directly to the “Adapter” tab, where I finally saw the details about my graphics card. Under the section labeled “Adapter Information,” I found the “Dedicated Video Memory” field, which showed the amount of VRAM installed on my graphics card. It was a relief to see this information clearly laid out; however, the journey to get here wasn’t as intuitive as I had hoped.
As I was pondering over this, I remembered that I had once read about another method to check VRAM, particularly if the Settings app wasn’t providing the information I needed. I decided to try the DirectX Diagnostic Tool, which I recalled was a utility that could provide detailed system information. To access it, I pressed the Windows key + R to open the Run dialog box and typed “dxdiag” before hitting Enter.
The DirectX Diagnostic Tool window opened, and I navigated to the “Display” tab. Here, I found a comprehensive overview of my graphics card, including the VRAM. The “Display Memory” field showed the total amount of VRAM, which was quite handy. I appreciated this method for its straightforward approach and clear presentation of system information.
Despite these methods providing the VRAM details I was looking for, I wanted to ensure I had the most current information and explore if there were any additional tools that might offer more insights. I decided to look into third-party applications designed for system monitoring. I downloaded a popular utility called GPU-Z, which is well-regarded for its ability to provide in-depth information about graphics cards.
Once installed, I opened GPU-Z and was greeted with a detailed interface displaying various attributes of my graphics card. The “Graphics Card” tab offered a section dedicated to VRAM details, including the total amount, used amount, and available amount. This level of detail was impressive and allowed me to monitor my VRAM usage in real-time, which was incredibly useful for understanding how my applications and games were utilizing the graphics resources.
With this newfound knowledge, I was able to assess whether my VRAM was sufficient for my needs or if I needed to consider an upgrade. I realized that having tools like these at my disposal provided not just the information I needed but also a broader understanding of my system’s performance.
In summary, discovering how much VRAM I had in Windows 11 and 10 required a bit of exploration. I first attempted to find the information through the built-in Settings app, which led me to the “Advanced display settings” and “Display adapter properties.” For more comprehensive details, I turned to the DirectX Diagnostic Tool, which also provided the necessary VRAM information. Additionally, I found third-party tools like GPU-Z to be exceptionally useful for obtaining detailed and real-time data about my graphics card.
Understanding how to check VRAM is crucial, especially when dealing with performance issues in gaming or video editing. By using these methods, I was able to gain clarity on my system’s capabilities and make informed decisions about potential upgrades. It turned out that my graphics card was functioning well within its parameters, but having this knowledge allowed me to optimize my setup and ensure that my system met the demands of my applications.