I remember the day vividly when I first realized that my new monitor could potentially support HDR, or High Dynamic Range. It was an exciting thought. I had just upgraded my PC setup, and the monitor I chose boasted HDR support as one of its features. Naturally, I was eager to see if Windows 11 could make the most of this capability. I had read about HDR’s ability to enhance image quality with more vibrant colors and better contrast, which promised to improve my gaming and multimedia experiences. However, the challenge was to verify whether my Windows 11 system was set up correctly to take advantage of HDR.
The journey began on a chilly afternoon when I booted up my PC and navigated to the Windows settings to check if HDR was enabled. I knew that Windows 11 had specific steps for this, and I hoped the process would be straightforward. I started by right-clicking on the desktop, which brought up the familiar context menu. Selecting “Display settings” was my first step. The display settings menu appeared, showing me various options related to screen resolution and orientation.
I immediately looked for the section labeled “Brightness and color.” This section was where I expected to find the HDR settings. The interface of Windows 11 had a clean, modern design, and the settings for HDR were tucked neatly within this section. I scrolled down and found a checkbox for “Play HDR games and apps.” This was the key setting I needed to verify. If this checkbox was active, it would mean that HDR was enabled on my system. To my surprise, the checkbox was grayed out, indicating that HDR was not currently available.
Determined to get to the bottom of this, I realized I needed to delve deeper into the problem. I knew that HDR support depended on a combination of factors, including the monitor’s capabilities, the graphics card, and the correct configuration of Windows 11. My next step was to ensure that my monitor was indeed capable of HDR. I checked the monitor’s specifications online and confirmed that it supported HDR10, which is the most common HDR standard.
Next, I turned my attention to the graphics card. My PC was equipped with a recent NVIDIA GeForce card, which should support HDR. However, I needed to ensure that the drivers were up to date. I opened the NVIDIA GeForce Experience software and navigated to the “Drivers” tab. Here, I checked for any available updates. Fortunately, the software indicated that my drivers were up to date. This meant that the graphics card was not the bottleneck.
With the monitor and graphics card confirmed as compatible, I returned to the Windows 11 settings. I realized that there might be additional steps to ensure HDR was fully functional. I navigated to the “Advanced display settings” from the same “Display settings” menu. Here, I looked for a button that said “Display adapter properties.” Clicking on it brought up a new window with tabs related to my monitor’s capabilities and settings. Under the “Monitor” tab, I saw a setting labeled “Use the following refresh rate.” I made sure that this was set to the highest possible refresh rate supported by my monitor. This was important because HDR content often requires a higher refresh rate for optimal performance.
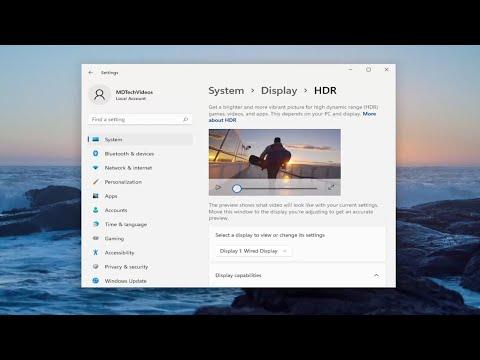
Even after making these adjustments, the HDR checkbox remained grayed out. I decided to investigate further into the Windows 11 settings. I performed a search for “HDR” in the search bar, hoping to find additional settings or troubleshooting tips. This search led me to a section called “Windows HD Color settings,” which provided more detailed options for HDR and WCG (Wide Color Gamut). Here, I found a list of supported displays and settings for HDR streaming. I checked to ensure that HDR was enabled under this section as well.
In this menu, I noticed a section for “Calibrate HDR for Windows.” This calibration process was something I had not yet explored. I followed the on-screen instructions to calibrate the HDR settings, which involved adjusting brightness levels and ensuring that the monitor displayed colors correctly. After completing the calibration, I returned to the “Brightness and color” settings to check if the HDR checkbox was now available.
Much to my relief, the HDR checkbox was no longer grayed out. I checked the box to enable HDR, and a prompt appeared asking me to restart my PC for the changes to take effect. I saved all my work and restarted the system. When the PC booted up again, I was eager to test HDR functionality.
I opened a video that I knew supported HDR content. As I watched, I could immediately see the difference. The colors were more vibrant, and the contrast between light and dark areas of the video was much more pronounced. The improvement was noticeable and gratifying. My initial excitement about HDR was validated, and I felt a sense of accomplishment for having successfully enabled this feature on my Windows 11 system.
In conclusion, the process of checking and enabling HDR support on Windows 11 involved several steps, including verifying monitor and graphics card compatibility, updating drivers, and configuring settings correctly. By methodically checking each component and following the steps to calibrate HDR, I was able to ensure that my system was fully capable of taking advantage of HDR technology. The enhanced visual experience was well worth the effort, making my gaming and multimedia experiences far more enjoyable.