I remember the first time I faced a major issue with spelling and grammar in my documents. It was during my college years when I had a crucial research paper due. I had put in countless hours of research and writing, but when it came time to finalize the document, I was overwhelmed by the number of errors that I had missed. My professor had made a note of some glaring mistakes that I had overlooked, and it was both embarrassing and frustrating. It was then that I realized how essential it was to have a reliable way to check spelling and grammar as I typed, rather than just relying on a final proofread.
At that moment, I decided to delve into the features of Microsoft Word, which I had been using for a while but had never fully explored. Microsoft Word is known for its comprehensive set of tools, and one of its most useful features is the ability to check spelling and grammar in real time. This feature can save a lot of time and ensure that documents are polished and professional.
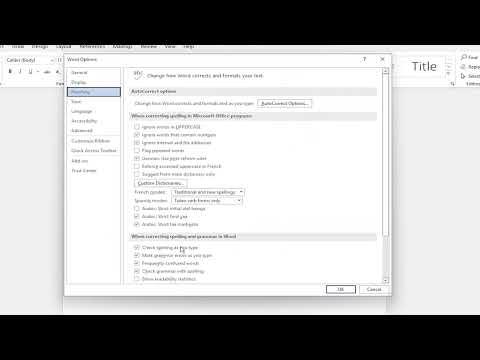
To get started, the first thing I did was ensure that my Microsoft Word settings were configured to check spelling and grammar automatically. I went to the “File” menu and selected “Options.” This opened up the Word Options dialog box where I navigated to the “Proofing” section. In this section, there were several checkboxes that allowed me to customize how Word handles spelling and grammar checks. I made sure that both “Check spelling as you type” and “Mark grammar errors as you type” were checked. This ensured that Word would underline any spelling mistakes with a red squiggly line and grammar issues with a blue or green squiggly line.
With these settings adjusted, I returned to my document. As I typed, any errors were immediately highlighted, allowing me to address them on the spot. I noticed that Word also provided suggestions for correcting spelling mistakes. By right-clicking on a misspelled word, a list of suggested corrections appeared, making it easy to choose the right option without having to look up words or guess the correct spelling.
However, I also discovered that while automatic spelling and grammar checks are incredibly helpful, they are not foolproof. For example, Word might not always catch contextual errors or more subtle grammatical issues. To address this, I took advantage of the “Review” tab on the ribbon. Under this tab, there is an option called “Spelling & Grammar” which, when clicked, runs a comprehensive review of the entire document. This tool checks not only for errors that I might have missed but also offers detailed explanations and suggestions for improving my writing.
One of the features that I found particularly useful was the “Editor” pane. It provides an in-depth analysis of the text, including grammar, clarity, and style suggestions. To access the Editor, I went to the “Home” tab and clicked on the “Editor” button, which opened a sidebar displaying a summary of issues found in my document. The Editor provided a clear breakdown of problems and suggested ways to enhance my writing, which was invaluable for polishing my paper to a professional standard.
Despite these tools, I knew that it was important not to rely solely on software for proofreading. I developed a habit of reading through my document multiple times to catch any nuances that automated tools might miss. Combining manual proofreading with Microsoft Word’s built-in tools ensured that my final document was as polished as possible.
In addition to the standard spelling and grammar checks, I explored other features within Microsoft Word that could further aid in creating error-free documents. For example, I discovered that Word allows users to add custom dictionaries, which was useful for including specialized terminology that I frequently used in my academic papers. This way, words that were not recognized by the default dictionary were not flagged as errors.
I also looked into using Microsoft Word’s language settings to check documents in different languages or dialects. This was particularly useful for academic papers that required the use of formal language or specific terminology. By selecting the appropriate language from the “Language” settings in the “Review” tab, I could ensure that my document adhered to the correct language rules and conventions.
The more I used these tools, the more proficient I became at spotting and correcting errors quickly. I realized that mastering these features not only improved the quality of my documents but also boosted my confidence in my writing skills. Over time, I developed a system that combined the automatic checks in Microsoft Word with a thorough manual review, resulting in documents that were both polished and professionally presented.
Reflecting on that first experience, I can see how crucial it was to become familiar with the tools available in Microsoft Word. The ability to check spelling and grammar as I typed saved me from numerous errors and helped me to produce high-quality documents efficiently. Now, whether I am writing a research paper, drafting a professional report, or simply composing an email, I rely on these features to ensure my writing is accurate and polished. Microsoft Word’s real-time spelling and grammar check has become an indispensable part of my writing process, making it a valuable tool for anyone who aims to produce clear and error-free documents.