When I first dove into the world of high dynamic range (HDR) gaming on my Windows PC, I was both excited and overwhelmed. I had heard that HDR could elevate my gaming experience to new heights, providing stunning visuals with enhanced contrast and vibrant colors. However, the journey to achieving the ultimate HDR setup was not as straightforward as I had anticipated. I remember vividly how I struggled with adjusting the HDR settings to get the best possible outcome. My initial setup seemed lackluster, and I felt like I was missing out on the full potential of my new HDR-compatible monitor.
The first issue I encountered was the confusion surrounding the HDR settings within Windows and my graphics card’s control panel. The default configurations didn’t seem to provide the immersive experience I was looking for. It was only after a few frustrating hours that I realized I needed a more systematic approach to configure HDR properly. The process began with ensuring that both my monitor and graphics card supported HDR and that all the necessary drivers were up-to-date. This was a critical step, as outdated drivers or incompatible hardware could lead to subpar performance or even non-functional HDR features.
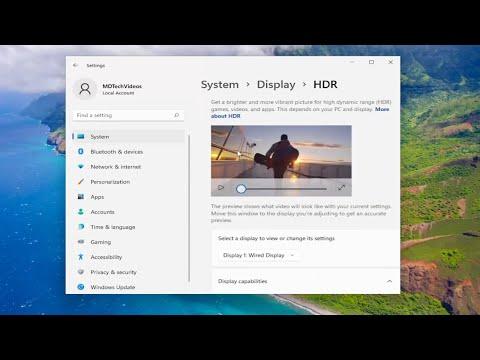
Once I confirmed that my hardware was HDR-ready, I proceeded to adjust the settings within Windows. To do this, I navigated to the ‘Display Settings’ menu and looked for the HDR options. I found that toggling HDR on and off made a noticeable difference in the display quality, but there was more to be done. I needed to fine-tune the settings to balance brightness, contrast, and color accuracy effectively. This involved enabling ‘HDR and WCG’ (Wide Color Gamut) under the ‘Windows HD Color settings’ and adjusting the ‘HDR/SDR brightness balance’ slider to match my preferences. This step was crucial in preventing any glaring or washed-out effects that could detract from the gaming experience.
Next, I had to delve into my graphics card’s control panel to make further adjustments. Whether I was using NVIDIA or AMD, each brand had its own set of tools for tweaking HDR settings. For NVIDIA, I opened the NVIDIA Control Panel and navigated to ‘Display’ settings, where I enabled HDR. For AMD users, the process involved accessing the AMD Radeon Settings and adjusting the ‘Display’ options accordingly. Each control panel offered additional settings to refine the HDR experience, such as adjusting gamma levels and color temperatures. It was essential to experiment with these settings to find the optimal balance for different games and content.
One aspect that I initially overlooked was the in-game HDR settings. Many modern games come with their own HDR configurations, which can significantly impact how HDR is rendered on your display. I discovered that accessing the ‘Graphics’ or ‘Display’ settings within each game allowed me to enable and adjust HDR according to my monitor’s capabilities. Some games also offered presets for HDR, which could simplify the process if I wasn’t sure how to tweak the settings manually. It was a learning curve, but each game had its unique settings that needed to be adjusted to achieve the best visual outcome.
Another challenge I faced was dealing with different content types. Not all games and media are created equal, and some might not fully support HDR or could display it differently. I found it helpful to test various games and content to see how they performed with the current settings. This trial-and-error approach allowed me to fine-tune the HDR settings for each specific game or application, ensuring that I achieved the best visual quality across the board.
In addition to the technical adjustments, I also learned that the room’s lighting conditions played a role in the HDR experience. Too much ambient light could affect how HDR content appeared on the screen. I experimented with adjusting the lighting in my gaming space to find a balance that complemented the HDR visuals. Dimmer lighting often enhanced the contrast and color saturation, making the gaming experience more immersive.
After weeks of adjustments and testing, I finally achieved the HDR setup I had envisioned. The colors were more vivid, the contrast was striking, and the overall gaming experience was greatly enhanced. It was a rewarding process, albeit a bit complicated, but the ultimate result was worth the effort. I learned that configuring the best HDR settings involves not only tweaking software and hardware settings but also understanding how different elements can influence the final visual output.
Reflecting on the journey, I realized that patience and persistence were key. It took time to understand how each setting affected the HDR experience, but the results were truly satisfying. The effort I put into configuring HDR settings paid off with a richer and more engaging gaming experience. For anyone looking to achieve the best HDR setup, I would recommend starting with a solid understanding of your hardware capabilities, experimenting with settings in both Windows and your graphics card control panel, and fine-tuning in-game settings to match your preferences. With these steps, you too can unlock the full potential of HDR gaming on your Windows PC.