I remember the first time I needed to create a numbered list on Google Docs. It was during a busy week of work when I was preparing a report that required a clear and organized structure. I had always used numbered lists in Microsoft Word before, so I assumed that creating one in Google Docs would be just as straightforward. However, I quickly found myself grappling with the interface and features of Google Docs, which seemed a bit different from what I was accustomed to.
Initially, I was unsure where to start. I had my document open and was staring at the toolbar, trying to figure out which icon or menu would lead me to the numbering options. The formatting tools were there, but they seemed to be arranged differently than in other word processors I had used. I knew that if I could just figure out the basics, I would be able to proceed with my report more efficiently. After a bit of trial and error, I managed to navigate through the process, and I’d like to share the steps that helped me overcome this challenge.
First, I clicked on the spot in the document where I wanted to start the numbered list. It was important to place the cursor exactly where I needed the list to begin because Google Docs would start numbering from that point onward. Next, I took a look at the toolbar at the top of the screen. I noticed that the toolbar had various icons for text formatting, but the one I needed was related to lists.
I found the icon for lists by looking for a series of small, stacked lines with numbers next to them. This icon, when clicked, presented me with options for creating both bulleted and numbered lists. Since I wanted a numbered list, I clicked on the numbered list icon, which instantly transformed the current paragraph into the first item of the list.
Once I clicked the numbered list icon, I started typing my first item. Google Docs automatically assigned the number “1” to the item and formatted it according to the default style. I was relieved to see that the numbers were incrementing automatically as I pressed “Enter” after each item, which saved me from manually numbering each line.
As I continued adding items to the list, I noticed that Google Docs was handling the numbering seamlessly. If I accidentally pressed “Enter” twice, creating a blank line, Google Docs removed the numbering from that line and continued numbering the subsequent lines. This was a feature I found quite useful, as it prevented any manual adjustments and kept the list organized.
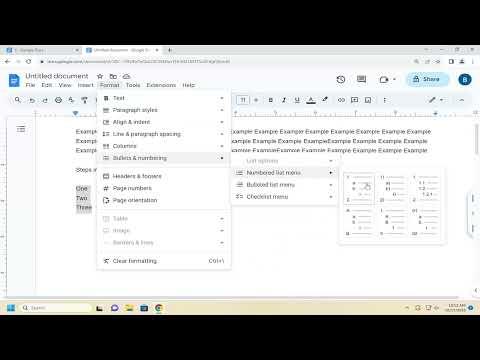
However, I also realized that I needed to customize the appearance of my numbered list to match the specific style required for my report. Google Docs allowed for customization, so I delved into the formatting options to adjust the list style. By clicking on the small arrow next to the numbered list icon, I accessed various formatting options such as changing the number format (e.g., roman numerals or letters), adjusting the indent levels, and modifying the text alignment.
I decided to change the number format to Roman numerals to better fit the formal style of my report. To do this, I selected the “Format” menu from the top of the screen, then navigated to “Align & indent,” and chose “Indentation options.” From there, I selected “List options” and then “Numbering type,” where I chose Roman numerals. The list immediately updated, and my document now reflected the desired style.
In addition to customizing the numbering format, I explored other formatting options to enhance the appearance of my list. For instance, I adjusted the indentation to ensure that the list items were properly aligned and visually appealing. Google Docs provided intuitive sliders and input boxes for precise control over the indentation levels. I made these adjustments by accessing the “Format” menu again, selecting “Align & indent,” and then “Indentation options.” Here, I could set specific values for left and right indentation, ensuring that the numbered list looked professional and consistent.
Another feature that I found useful was the ability to create sub-lists or nested lists. If I needed to include sub-items under a main item, I simply pressed the “Tab” key while typing an item. This action indented the item and changed the numbering format to a sub-level, typically using a different numbering style or bullet points. To return to the main list level, I used the “Shift + Tab” key combination, which reversed the indentation.
As I continued working on my report, I became more comfortable with the numbered list features in Google Docs. The process, which initially seemed daunting, became second nature. I appreciated how Google Docs handled numbering automatically and offered various customization options to suit my needs.
Looking back, I realize that while my initial struggle with creating a numbered list in Google Docs was frustrating, it was also a valuable learning experience. I was able to quickly adapt to the platform’s features and found that Google Docs provided the tools I needed to create a well-structured and professional-looking document. By familiarizing myself with the formatting options and experimenting with different settings, I was able to achieve the desired results and complete my report efficiently.