I was working on a project that required me to send out a batch of formal invitations, and I realized that I needed to create custom envelopes for them. My goal was to make the process as efficient and polished as possible, so I decided to use Microsoft Word, a tool I was somewhat familiar with but had never used for envelope creation. I knew that Word had the capability to handle this task, but I wasn’t entirely sure how to go about it. After a bit of research and experimentation, I figured out a straightforward method to create envelopes in Microsoft Word. Here’s how I managed to do it.
First, I opened Microsoft Word and started with a blank document. I went to the “Mailings” tab on the ribbon at the top of the screen. This tab is specifically designed for tasks related to mail merges and envelope creation. Under this tab, I found the “Envelopes” button and clicked on it to open the Envelopes and Labels dialog box.
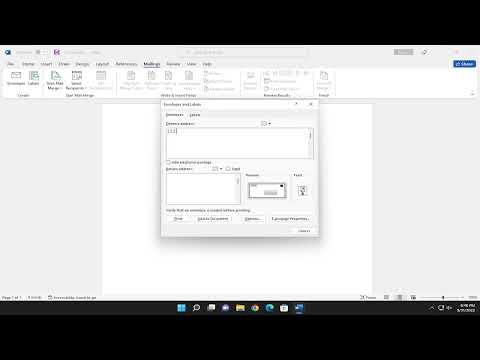
In the dialog box that appeared, I noticed that there were two main sections: one for the delivery address and one for the return address. I started by entering the delivery address in the designated field. I typed in the recipient’s name, street address, city, state, and zip code. Since the invitations I was sending were formal, I wanted the address to look neat and professional. I made sure to double-check the address for any typos or errors before moving on.
Next, I entered my own return address in the appropriate field. This step was crucial because it ensured that if the envelope couldn’t be delivered, it would be returned to me. I filled in my name, street address, city, state, and zip code. Again, accuracy was important, so I reviewed this information carefully.
Once I had filled in both addresses, I clicked on the “Options” button in the Envelopes and Labels dialog box. This allowed me to select the size of the envelope I was using. Microsoft Word offers several standard envelope sizes, such as #10 (4.125″ x 9.5″) and #9 (3.875″ x 8.875″). Since I was using a custom size, I clicked on the “Custom Size” button and entered the dimensions of my envelope. After entering the dimensions, I clicked “OK” to confirm.
With the envelope size set, I moved on to customizing the design and layout of the envelope. I clicked on the “Add to Document” button. This action inserted the envelope into a new Word document. I took a moment to preview how the envelope looked and made any necessary adjustments. I wanted to ensure that the text was centered and properly aligned.
To further customize the envelope, I used the tools available in Word. I selected the text and used the font and size options to make the delivery and return addresses stand out. I chose a formal font that matched the style of the invitations I was sending. Additionally, I adjusted the margins and spacing to ensure that the addresses were positioned correctly.
After making all the necessary adjustments, I wanted to save my work. I saved the document with a descriptive name so I could easily locate it later. Since I had a list of multiple addresses to print, I decided to use the mail merge feature to automate the process. This way, I could print multiple envelopes with different addresses without having to manually enter each one.
To start the mail merge, I went back to the “Mailings” tab and clicked on “Start Mail Merge.” From the drop-down menu, I selected “Envelopes.” This allowed me to specify the type of envelope I was working with and ensured that the addresses would be formatted correctly for each envelope.
Next, I clicked on “Select Recipients” and chose “Use an Existing List.” I selected an Excel spreadsheet containing the list of addresses. This spreadsheet had columns for recipient names and addresses, and it was well-organized. I made sure that the data was correctly mapped to the envelope fields.
With the recipient list selected, I inserted the merge fields into the envelope template. I placed the fields for the recipient’s name and address into the appropriate positions on the envelope. I also ensured that the return address was included in the correct location.
Finally, I clicked on “Finish & Merge” and selected “Print Documents.” Microsoft Word generated a preview of all the envelopes with the different addresses and formatted them according to the specifications I had set. I reviewed the preview to ensure everything looked correct before sending the envelopes to the printer.
When the printing was complete, I had a batch of perfectly formatted envelopes ready to go. The process that seemed daunting at first turned out to be quite manageable with Microsoft Word’s tools and features. I was able to create and print custom envelopes efficiently, and the envelopes looked professional and polished.
Looking back, I was pleased with how smoothly everything went. The step-by-step approach I took made the process straightforward, and using the mail merge feature saved me a lot of time. Whether you’re preparing for a special event or just need to send out a series of mailings, Microsoft Word’s envelope feature is a valuable tool that can help you achieve a professional result with ease.