Disabling background apps in Windows 11 can help improve system performance and battery life, especially if you’re running a laptop or a device with limited resources. If you’re looking to streamline your Windows experience and ensure that only the applications you want are running in the background, here’s a comprehensive guide to achieving that.
Firstly, open the **Settings** app. You can do this quickly by pressing `Win + I` on your keyboard. This will bring up the Settings menu where you can adjust various system preferences. Once you’re in the Settings app, click on **Privacy & Security** on the left sidebar. Under this section, you’ll find a variety of privacy-related settings. Click on **Background Apps**. This is where you can manage which apps are allowed to run in the background.
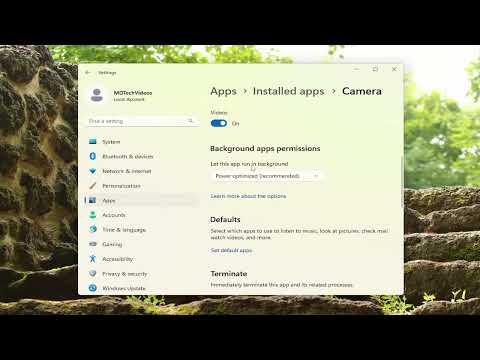
In the **Background Apps** section, you will see a list of all the apps installed on your system that are capable of running in the background. Each app will have a toggle switch next to it. By default, some apps may be allowed to run in the background to ensure they stay updated with the latest information or notifications. To disable a specific app from running in the background, simply turn off its toggle switch. This will prevent it from using system resources when it is not actively being used.
If you want to take a more holistic approach, you can also manage background apps by changing a system-wide setting. Go back to the main **Privacy & Security** page in the Settings app and select **Background Apps**. At the top of this page, you will see an option to allow or disallow background apps globally. You can choose to turn off the ability for apps to run in the background entirely. This means that no apps will be able to perform background tasks, which can be particularly useful if you’re looking to maximize performance or battery life.
After making your changes, it’s always a good idea to restart your computer. This ensures that all settings are properly applied and that any apps that were previously running in the background are now fully stopped. You can check if the changes have taken effect by observing the performance of your system and noting any improvement in battery life or system responsiveness.
For advanced users who want even more control over background processes, you can use the Task Manager. To open Task Manager, press `Ctrl + Shift + Esc` or right-click on the taskbar and select **Task Manager**. In Task Manager, go to the **Processes** tab. Here, you can see a list of all running processes, including those running in the background. If you notice any applications that are consuming excessive resources, you can right-click on them and select **End Task** to close them. This can help in managing applications that might not be listed in the Background Apps settings but are still running in the background.
Additionally, some apps might have their own settings for background activity. For instance, certain apps allow you to adjust how they handle background processes within their own settings menu. It’s worth checking the individual settings of apps that you frequently use to ensure they are configured according to your preferences.
By following these steps, you can effectively control which apps are allowed to run in the background on your Windows 11 system. This not only helps in optimizing the performance of your computer but also extends battery life and provides a more efficient computing experience. Whether you prefer a granular approach by managing each app individually or a broader approach by disabling background activity system-wide, Windows 11 offers flexible options to suit your needs.