When I decided to tackle the issue of disabling the drag-to-snap feature on the top of the screen in Windows 11, I was motivated by a desire to regain control over my workspace and minimize disruptions caused by accidental window snaps. This feature, which allows you to quickly snap windows to different parts of the screen by dragging them to the edges, can be incredibly useful for productivity. However, it can also become a nuisance if you frequently find yourself inadvertently triggering it when you don’t intend to.
The process of disabling this feature involves a few steps, and although it may seem a bit technical, it’s straightforward once you get the hang of it. I’ll walk you through the exact procedure I followed to turn off this specific snapping feature.
First, I opened the Settings app by clicking on the Start menu and then selecting “Settings” from the list. Alternatively, I could have used the keyboard shortcut `Win + I` to access the Settings directly. Once the Settings window was open, I navigated to the “System” category.
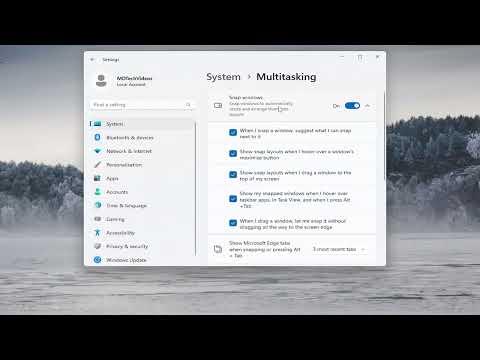
Within the “System” section, I clicked on “Multitasking,” which is where Windows 11 allows you to manage various snapping options. Here, I found the settings related to Snap layouts and Snap Assist. To specifically address the drag-to-snap feature, I focused on the options under “Snap windows.”
In this section, there was a toggle switch for “Snap windows,” which controls whether the snap features are enabled or disabled. By turning off this toggle, I could effectively disable all snapping features, including the drag-to-snap behavior at the top of the screen. However, this might not have been ideal if I wanted to retain some of the snapping functionalities, so I needed to delve a bit deeper.
To refine my control, I looked at additional options within the “Snap windows” settings. These options allow you to adjust specific aspects of the snapping behavior. For example, there were settings for adjusting how windows snap when dragged to the corners or edges of the screen, as well as when they are maximized or minimized.
The setting I was particularly interested in was “When I drag a window to the top of the screen, maximize it.” By unchecking this option, I could prevent windows from automatically maximizing when dragged to the top edge of the screen, which directly addressed my concern. This option was clearly labeled, making it easy to find and modify.
I took a moment to ensure that other related settings, such as those controlling snap assist and how windows are arranged on screen, were also configured to my preference. This included turning off other features if I found them unnecessary, like the ability to snap windows into predefined layouts or to have windows automatically suggest layouts when multiple applications are open.
After making these adjustments, I applied the changes and closed the Settings window. To confirm that the changes had taken effect, I tested dragging a window to the top of the screen to see if it still snapped into a maximized view. As expected, the window no longer maximized automatically, which was exactly the result I wanted.
In addition to modifying these settings through the GUI, I considered looking into the Windows Registry for more advanced configuration options. The Windows Registry is a powerful tool for customizing various aspects of the operating system, but it requires caution. I knew that making incorrect changes could potentially cause system instability. However, for those comfortable with advanced tweaks, the Registry Editor provides a way to adjust even more granular settings related to snapping.
I accessed the Registry Editor by typing “regedit” into the Start menu search bar and pressing Enter. Once in the Registry Editor, I navigated to `HKEY_CURRENT_USER\Control Panel\Desktop`. Here, I looked for values related to window management and snapping. While I found some related entries, I ultimately decided it was safer to stick with the settings available in the main Settings app rather than modifying the Registry.
Having completed the adjustments, I felt confident that my Windows 11 environment was now configured to better suit my workflow. Disabling the drag-to-snap feature at the top of the screen helped reduce the accidental interruptions I had been experiencing, allowing me to work more efficiently and with fewer distractions.
Overall, the process was relatively straightforward and provided a sense of accomplishment once completed. It’s a reminder of how customizable Windows 11 can be and how even small tweaks can significantly enhance the user experience. For anyone else looking to disable or modify snap features in Windows 11, following these steps should help streamline your workspace and tailor the operating system to better fit your needs.
