I remember the day when I first encountered the need to disable Microsoft Defender Antivirus on my Windows 11 system. It was a regular Tuesday morning, and I was in the middle of a crucial project. Everything seemed to be going smoothly until I started facing unexpected performance issues. My computer, usually swift and responsive, began to lag noticeably. I tried to pinpoint the cause and discovered that the slowdown was linked to Microsoft Defender Antivirus.
As someone who frequently works with various software tools and sometimes needs to test or install programs that might be flagged by antivirus software, I found that Defender’s constant scanning and real-time protection were interfering with my workflow. I realized that to get my work done efficiently, I needed to disable Microsoft Defender temporarily. What followed was a journey to find a straightforward method to accomplish this task without causing any unnecessary complications.
I began by searching for solutions online, reading through various forums and articles. The process seemed somewhat convoluted at first, and I wanted to make sure I wasn’t missing any crucial steps or inadvertently compromising my system’s security. After gathering enough information, I decided to take action based on the guidance I had found. Here’s a detailed account of how I managed to disable Microsoft Defender Antivirus on my Windows 11 computer.
First, I accessed the Start Menu by clicking on the Windows icon located at the bottom-left corner of my screen. From there, I typed “Windows Security” into the search bar and selected the Windows Security app from the search results. This application is the central hub for managing security settings on Windows 11.
Once the Windows Security app opened, I navigated to the “Virus & Threat Protection” section. This section is crucial because it contains all the settings related to antivirus protection. I clicked on the “Manage settings” link under the “Virus & threat protection settings” heading. This took me to a new page where I could adjust various settings for Microsoft Defender.
On this page, I noticed an option labeled “Real-time protection.” Real-time protection is a feature that constantly monitors your system for any potential threats. To disable it, I toggled the switch to the “Off” position. As soon as I did this, a confirmation dialog appeared, asking if I was sure I wanted to turn off real-time protection. I confirmed my choice, and the feature was disabled.
While disabling real-time protection was a critical step, I knew that Windows Defender’s cloud-delivered protection and automatic sample submission features could still be active. To ensure that these features were also disabled, I returned to the “Virus & threat protection settings” page. I found options for “Cloud-delivered protection” and “Automatic sample submission.” I toggled both of these options to “Off” to prevent Microsoft Defender from sending any data to Microsoft’s servers or receiving updates that might re-enable protection.
At this point, I had successfully turned off the primary components of Microsoft Defender Antivirus. However, I was aware that Windows 11 might reactivate some of these features after a while or upon a system restart. To address this, I decided to explore more permanent solutions. I navigated to the “Group Policy Editor,” a powerful tool that allows users to configure advanced settings on their system.
To access the Group Policy Editor, I pressed the Windows key + R to open the Run dialog box. I typed “gpedit.msc” and pressed Enter. This opened the Group Policy Editor. I expanded the “Computer Configuration” section, then “Administrative Templates,” and finally “Windows Components.” Within this folder, I located and selected “Microsoft Defender Antivirus.”
In the Microsoft Defender Antivirus section, I found a policy named “Turn off Microsoft Defender Antivirus.” I double-clicked on this policy to open its settings. I selected the “Enabled” option to disable Microsoft Defender Antivirus entirely and then clicked “Apply” followed by “OK.” This action should prevent Microsoft Defender from running, but I knew that some additional measures might be required.
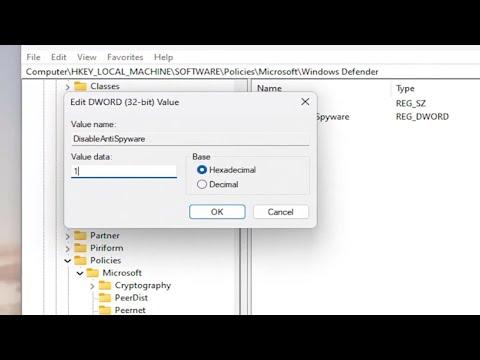
To ensure that Microsoft Defender would remain disabled even after system restarts, I also checked the Windows Registry. I pressed Windows key + R to open the Run dialog box again, typed “regedit,” and pressed Enter to open the Registry Editor. I navigated to the following path: HKEY_LOCAL_MACHINE\SOFTWARE\Policies\Microsoft\Windows Defender. If there was a registry key named “DisableAntiSpyware,” I made sure its value was set to “1.” This key controls whether Microsoft Defender is active or not.
After completing these steps, I restarted my computer to confirm that Microsoft Defender Antivirus was indeed disabled. My system seemed to perform better, and I could carry on with my work without interruptions. However, I remained vigilant about the need for antivirus protection. Since I had disabled Microsoft Defender, I ensured that I had a reliable alternative security solution in place to keep my system safe.
Disabling Microsoft Defender Antivirus is a process that requires careful attention to detail, but by following these steps, I was able to temporarily turn off the antivirus to improve system performance. Always remember to re-enable your antivirus or ensure you have another security solution in place to protect your computer from potential threats.
