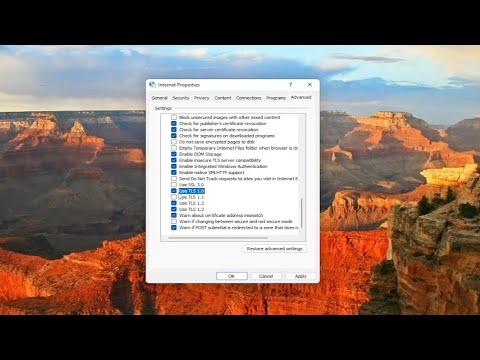
I encountered an issue recently that left me scratching my head. As someone who frequently handles sensitive information, I knew that ensuring the highest levels of security was crucial. One day, during a routine security review, I discovered that my system was still using TLS 1.0, an outdated protocol that is considered insecure by today’s standards. The realization hit me hard; I needed to act swiftly to disable TLS 1.0 in my Windows 11/10 environment to ensure my data remained protected.
The first step in addressing this problem was to understand why TLS 1.0 needed to be disabled. TLS, or Transport Layer Security, is a protocol that provides privacy and data integrity between two communicating applications. While TLS 1.0 was once considered a robust security measure, it has since been deprecated due to various vulnerabilities. Modern systems and websites have moved on to TLS 1.2 or TLS 1.3, which offer enhanced security features. Leaving TLS 1.0 enabled could potentially expose my system to various attacks, so it was imperative to update my security settings.
To tackle this issue, I needed to disable TLS 1.0 on my Windows 11/10 machine. Here’s how I proceeded:
Step 1: Open Internet Options
The first action was to access the Internet Options settings. I started by typing “Internet Options” into the search bar on the taskbar. This opened up the Internet Properties dialog, where I could configure a variety of settings related to internet security and connections.
Step 2: Navigate to the Advanced Tab
Within the Internet Properties dialog, I switched to the “Advanced” tab. This section allows you to adjust various advanced settings related to internet connectivity and security protocols.
Step 3: Modify the Security Settings
Scroll down to the “Security” section in the Advanced tab. Here, I found a list of checkboxes related to different security protocols. I noticed that TLS 1.0 was checked, indicating that it was currently enabled.
Step 4: Disable TLS 1.0
To disable TLS 1.0, I simply unchecked the box next to “Use TLS 1.0.” This action effectively disabled the outdated protocol. I also made sure that TLS 1.1, TLS 1.2, and TLS 1.3 were enabled, ensuring that my system would use more secure alternatives.
Step 5: Apply the Changes
After making these adjustments, I clicked “Apply” and then “OK” to save the changes. To ensure that these settings took effect, I restarted my computer. This step was crucial, as some changes to security settings may only take effect after a system reboot.
Step 6: Verify the Configuration
Once my computer restarted, I wanted to verify that TLS 1.0 had indeed been disabled. I used a tool called “SSL Labs’ SSL Test” to check the security configuration of my system. The results confirmed that TLS 1.0 was no longer in use, and my system was now operating with the more secure protocols.
Throughout this process, I made sure to document each step. This not only helped me keep track of the changes but also provided a reference for future adjustments. Additionally, I took the opportunity to review and update other security settings to ensure comprehensive protection.
Disabling TLS 1.0 was a critical step in enhancing my system’s security. By following these steps, I ensured that my communications and data were protected by modern security protocols. This proactive approach not only safeguarded my information but also provided peace of mind, knowing that my system was up-to-date with the latest security standards.
Overall, addressing this issue was a reminder of the importance of regularly reviewing and updating security settings. In an ever-evolving digital landscape, staying ahead of potential threats is essential. By delving into these settings and making necessary adjustments, I was able to maintain a secure environment for my data and communications.
