I had always considered myself fairly tech-savvy, so when I upgraded to Windows 11, I was eager to explore all its new features. However, one day I encountered an issue that I hadn’t anticipated. While watching a video online, I realized that I had trouble keeping up with the dialogue. The video was important, and I needed to understand every word. I knew that there must be a way to enable captions, so I decided to dive into Windows 11’s settings to find a solution.
As I began to investigate, I discovered that Windows 11 offers a feature called Live Captions, which automatically generates captions for any audio playing on your computer. This was exactly what I needed. But I wasn’t familiar with how to activate and customize this feature, so I started by opening the Settings app.
Navigating through Windows 11’s settings felt intuitive at first. I clicked on the Start menu and then selected the gear icon to access the Settings app. Once inside, I saw that the layout was clean and organized, but I still needed to find the exact location for Live Captions. I decided to use the search bar at the top of the Settings window and typed in “Live Captions.”
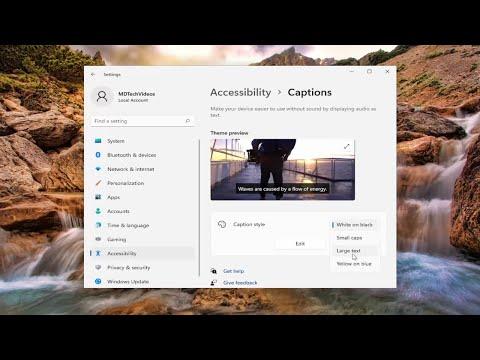
To my relief, the search results quickly pointed me to the relevant section. I clicked on “Accessibility,” and within that menu, I found “Captions.” This was where the magic happened. The first thing I noticed was an option to turn on Live Captions. I toggled the switch, and almost immediately, captions started appearing on my screen for the audio that was currently playing. It was a great start, but I wanted to make sure the captions were customized to my preferences.
I returned to the Captions settings and explored the customization options. I found that Windows 11 offers a fair amount of flexibility. The first option allowed me to change the caption text size. I adjusted the slider to make the text larger so that it would be easier to read from a distance. Next, I explored the option to change the caption background color. I opted for a semi-transparent background, which made the text stand out more without completely obstructing the video I was watching.
One of the features I appreciated was the ability to adjust the caption text color. I chose a bright yellow, which provided a nice contrast against the semi-transparent background. The settings also allowed me to choose different fonts. I went with a clean, sans-serif font that was easy on the eyes. These small adjustments made a significant difference in how comfortable I felt reading the captions.
I also took some time to familiarize myself with additional settings available under “Advanced captions.” Here, I found options to enable or disable captions for specific types of content. For instance, I could choose to show captions only for videos or also for system sounds and notifications. I decided to enable captions for all audio sources since it would be useful in various scenarios, such as when I’m working in a noisy environment.
After setting up Live Captions, I tested them across different applications to ensure they worked as expected. I opened several videos, including a YouTube video and a streaming service, and found that the captions were accurate and synced well with the audio. I was impressed by how well the feature handled different accents and speech patterns.
However, I ran into a minor issue when using Live Captions with some older software that wasn’t fully compatible with Windows 11. In these cases, the captions were either delayed or didn’t appear at all. I realized that this might be a limitation related to the specific application rather than the Live Captions feature itself. To address this, I made a note to check for updates to the software and looked into alternative applications that offered better integration with Live Captions.
Overall, enabling and customizing Live Captions on Windows 11 turned out to be a straightforward process that greatly enhanced my multimedia experience. By adjusting the text size, background color, text color, and font, I was able to tailor the captions to my liking. The ability to enable captions for all audio sources proved to be a valuable feature, especially in environments where understanding spoken content is crucial.
I was pleased with the outcome and felt confident that I had made the most of Windows 11’s Live Captions feature. It was a useful tool that not only helped me understand the content better but also made my computing experience more inclusive and accessible. As I continued to use Windows 11, I felt more adept at navigating its features and customizing them to fit my needs.
