I found myself in a frustrating situation recently while working on an important financial report for my team. I had prepared all the data meticulously and designed some sophisticated formulas to automate our financial calculations. Everything seemed to be going smoothly until I realized that my macros weren’t running. This issue was baffling, considering I had used macros in Excel before without any problems. I was in a time crunch, and the deadline was looming over me. Determined to resolve the issue, I knew I needed to get those macros working quickly.
At first, I was unsure why my macros were disabled. I had a vague recollection that Excel sometimes had security settings that could prevent macros from running, but I wasn’t entirely sure where to look or how to change these settings. I decided to delve into the settings to find out what was going wrong. My goal was to find the ultimate solution to enable macros so that my automation could proceed without hitches.
I started by opening Excel and navigating to the File menu. From there, I selected “Options,” which opened a new window for Excel’s settings. Within the options menu, I clicked on “Trust Center,” which is where Excel houses its security and privacy settings. This seemed like the right place to address macro issues.
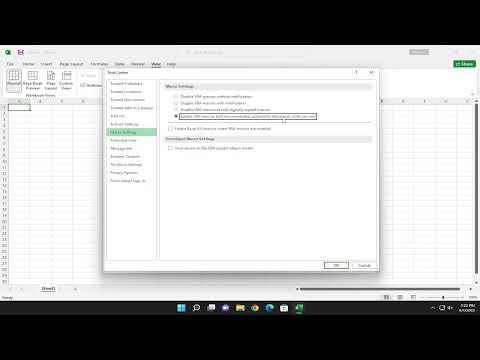
Next, I clicked on “Trust Center Settings,” which led me to a new dialog box with several categories. I noticed the “Macro Settings” category and clicked on it. Here, I found four different options related to macros:
- Disable all macros without notification – This setting prevents any macros from running and doesn’t alert you if macros are present in a file.
- Disable all macros with notification – This setting disables macros but will notify you if there are macros present, allowing you to enable them on a case-by-case basis.
- Disable all macros except digitally signed macros – This setting allows macros that have been digitally signed by trusted publishers while disabling others.
- Enable all macros – This setting allows all macros to run without any restrictions.
Given my situation, I needed to enable all macros temporarily to get my work done. I selected the fourth option, “Enable all macros,” and also checked the box that says “Trust access to the VBA project object model” to ensure there wouldn’t be any restrictions on accessing the VBA (Visual Basic for Applications) project, which is often necessary for more complex macro functions.
After adjusting these settings, I clicked “OK” to save my changes and exited the options menu. I then reopened my workbook and tried running the macros again. To my relief, the macros worked as intended! The automated calculations and processes executed flawlessly, and I was able to complete my report on time.
It was clear that the issue was due to the default security settings in Excel, which are designed to protect users from potentially harmful macros. By changing the macro settings, I was able to get my automation back on track. I learned that understanding and adjusting Excel’s security settings can resolve issues related to macro functionality. In future projects, I’ll remember to check these settings if I encounter similar issues.
