It was one of those late nights where everything seemed to blend together in a haze of exhaustion and determination. I was working on a project that required managing a vast array of files and folders, and the default view in File Explorer was making it a nightmare to navigate. I needed a way to make things more compact to see everything at a glance. That’s when I found myself wrestling with the challenge of enabling and disabling the Compact View in File Explorer on my Windows 11 machine.
Initially, I was completely overwhelmed. I had heard of Compact View before, but the specifics on how to enable or disable it in Windows 11 were elusive. I had dabbled in the settings before, but the exact steps always seemed to escape me. My frustrations peaked as I scoured various forums and support pages, but the answers were either outdated or didn’t apply to my version of Windows.
Determined to get things under control, I decided to tackle the issue head-on. The first thing I did was open File Explorer. I knew that this was the starting point for any adjustments I needed to make. With File Explorer open, I navigated to the “View” tab in the top menu. This was where I hoped to find the controls I needed.
In Windows 11, the settings and options can sometimes be a bit elusive compared to previous versions. The Compact View wasn’t immediately obvious, which led me to wonder if perhaps this feature had been moved or renamed. I went through the options available, including different view settings such as “Large icons,” “Medium icons,” “Small icons,” and “List.” None of these seemed to directly offer a Compact View option.
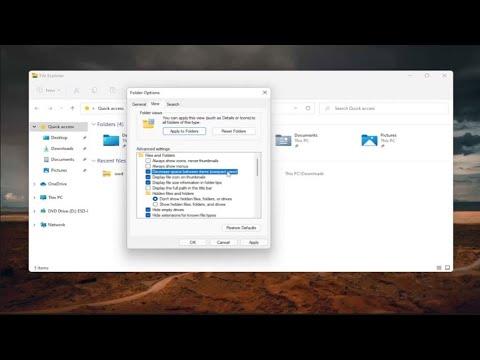
After some digging, I realized that the Compact View might be more nuanced and not always visible in the immediate options. I decided to delve deeper into the File Explorer settings and also looked at the Folder Options. By clicking on the three-dot menu icon at the top right corner of the File Explorer window and selecting “Options,” I accessed the Folder Options.
Within Folder Options, I navigated to the “View” tab. Here, I found a range of settings related to how files and folders are displayed. It became clear that enabling or disabling Compact View wasn’t as straightforward as flipping a single switch; it was about adjusting the overall presentation to achieve a more compact look. The key option I needed was related to “Display file icon on thumbnails” and other related settings. By unchecking certain options, I managed to make the view more compact.
In addition to this, I adjusted the size of the icons and the spacing between items. By choosing smaller icons and reducing the spacing, I managed to create a more compact view manually. This method wasn’t as direct as I had hoped, but it gave me the result I needed.
Feeling a bit triumphant, I then tested whether this setting persisted across different folders and windows. To my relief, the adjustments I made worked consistently, making my navigation through files much more efficient. I could finally see more files at once and organize them without having to scroll endlessly.
Reflecting on this process, I realized that while the Compact View option might not be explicitly named in Windows 11, the ultimate goal was to achieve a more efficient use of space. By understanding the available settings and making strategic adjustments, I managed to tailor the File Explorer view to my needs.
This experience taught me that sometimes solutions are not about finding a specific feature but about using available tools creatively to achieve the desired outcome. My late-night struggle with File Explorer turned into a learning opportunity that made me appreciate the flexibility within Windows’ settings.