One day, I was working on a project with multiple deadlines and a tight schedule. My workflow was heavily dependent on automated tasks to manage regular updates and backups efficiently. I had set up a few scheduled tasks in Windows 10 to handle these responsibilities, and everything was running smoothly. However, as I started working on new tasks and revising old ones, I noticed that some of my scheduled tasks were either not running as expected or causing unnecessary delays. This led me to the realization that I needed to adjust these tasks—either enabling or disabling them based on the current needs of my workflow.
The problem began when I noticed my computer behaving oddly. Some tasks I had set to run in the background were either not executing or were interfering with other processes. I had to find a way to efficiently manage these scheduled tasks to avoid disrupting my work. Windows 10’s Task Scheduler seemed to be the perfect tool to tackle this issue, but I needed to get a better handle on how to enable or disable tasks as required.
After some research, I discovered that Windows 10 (and its newer version, Windows 11) offers a built-in utility called Task Scheduler that provides extensive options for managing scheduled tasks. This utility allows users to create, modify, enable, or disable tasks based on their specific needs. Here’s how I tackled the problem of managing scheduled tasks:
First, I opened the Task Scheduler. To do this, I clicked on the Start menu and typed “Task Scheduler” into the search bar. Once the Task Scheduler application appeared in the search results, I clicked on it to launch it.
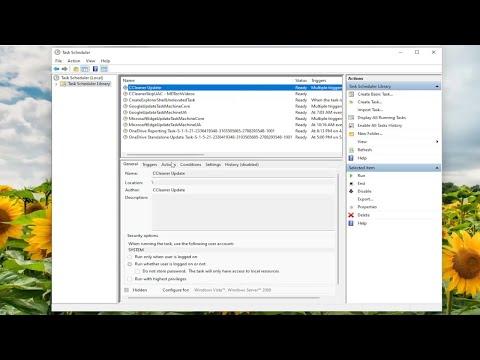
The Task Scheduler window opened with a user interface that might initially seem overwhelming. The left pane of the window displays a hierarchical view of all the folders and tasks. The middle pane shows details about the selected task or folder, and the right pane provides actions that can be performed.
To find the tasks I needed to adjust, I navigated to the “Task Scheduler Library” in the left pane. This section lists all the tasks that have been created. I located the specific task I wanted to modify. It was crucial to identify the correct task because making changes to the wrong one could lead to unintended consequences.
Once I found the task, I right-clicked on it to open a context menu with several options. To disable the task, I selected the “Disable” option. This action would stop the task from running based on its schedule but keep it in the Task Scheduler for future reference or reactivation. Disabling a task is useful when you know that you won’t need it temporarily but might want to enable it later without having to recreate it.
If I needed to enable a task that had been previously disabled, the process was quite similar. I right-clicked on the task and selected “Enable” from the context menu. This option would reactivate the task according to its set schedule and any associated triggers.
To ensure that changes were applied correctly, I reviewed the task’s properties. By right-clicking the task and selecting “Properties,” I could access various tabs that displayed detailed settings for the task, including triggers, actions, and conditions. In the “General” tab, I confirmed that the task was enabled or disabled as needed. In the “Triggers” tab, I reviewed the schedule settings to ensure that they aligned with my current requirements.
I also learned that the Task Scheduler allows for a more advanced level of customization. For instance, if a task was disabled due to specific conditions or criteria that I wanted to modify, I could use the “Conditions” and “Settings” tabs in the task properties window to adjust these parameters. This fine-tuning helped optimize the task’s performance and integration with my workflow.
On a few occasions, I had to delete tasks that were no longer needed. To do this, I right-clicked on the task and selected “Delete” from the context menu. Deleting a task removed it from the Task Scheduler, freeing up system resources and reducing clutter.
It was also important to keep in mind that tasks can be scheduled to run with different levels of privileges. In the “General” tab of the task properties, I could specify whether the task should run only when the user is logged on or whether it should run with the highest privileges. Adjusting these settings was critical for tasks that required administrative rights or needed to run independently of user sessions.
Overall, managing scheduled tasks in Windows 10 and Windows 11 using the Task Scheduler proved to be an effective solution for optimizing my workflow. By enabling or disabling tasks as needed, I was able to streamline my processes and ensure that my computer performed efficiently. The Task Scheduler provided the flexibility to adapt to changing requirements, which was essential for managing a dynamic and busy work schedule.
