I remember the day I first encountered the issue of managing Snap Layouts on Windows 11. It all began when I was working on a critical project for work, juggling multiple applications and documents simultaneously. The new Snap Layouts feature seemed like a promising tool, offering a way to organize windows efficiently. However, as I tried to get a grip on its functionality, I found myself in a bit of a bind, unsure how to enable or disable this feature to suit my needs.
At first, I was impressed with the concept of Snap Layouts. Windows 11 introduced this feature to make multitasking smoother by allowing users to quickly arrange windows into predefined layouts. This feature seemed particularly useful for organizing my workspace, especially when dealing with multiple windows. But as I continued using it, I realized that Snap Layouts didn’t always align with my workflow. I found myself accidentally triggering the layout options, which interrupted my work and caused a bit of frustration.
One day, as I was deeply engrossed in a detailed report and switching between various applications, I accidentally activated a Snap Layout. It was a small annoyance, but it grew into a significant distraction. I needed to find a way to control this feature, either by enabling it when I needed it or disabling it entirely if it was getting in the way.
I started my quest for a solution by delving into the settings of Windows 11. I figured that if I wanted to have precise control over Snap Layouts, I needed to first understand how to access and adjust these settings. I opened the Settings app, which is where many of the customization options reside.
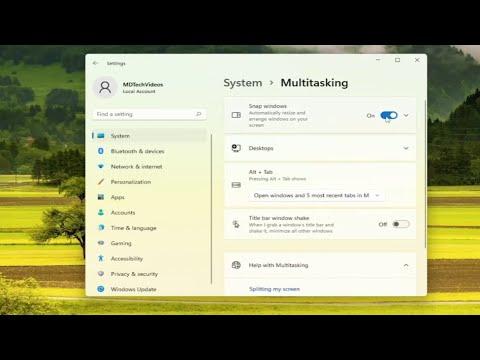
The first step was to navigate to the “System” section. From there, I clicked on “Multitasking,” where I discovered the settings related to Snap Layouts. This area provided me with the control I needed. There were several options to configure Snap Layouts, including enabling or disabling the feature altogether.
To enable Snap Layouts, I toggled the switch to the “On” position. This setting allowed Windows 11 to display Snap Layouts automatically when I hovered over the maximize button of a window or dragged a window to the edge of the screen. It was an excellent way to streamline my workflow when I wanted to organize multiple windows quickly.
On the other hand, if I wanted to disable Snap Layouts, I simply toggled the switch to the “Off” position. This action would prevent Snap Layouts from appearing, giving me a more straightforward experience when managing my windows. I found this particularly useful when I needed to focus solely on one application without any additional layout distractions.
But I didn’t stop there. I wanted to dive deeper into the customization options to refine how Snap Layouts worked according to my preferences. Within the same “Multitasking” section, I found additional settings that allowed me to control aspects like Snap Assist. This feature shows me which windows are available to snap into the remaining space when I’m arranging multiple windows. I adjusted these settings to ensure that Snap Assist worked in a way that was most beneficial to my workflow.
In addition, I discovered that there were options to manage how Snap Layouts functioned with multiple displays. If I had more than one monitor connected to my system, I could configure Snap Layouts to work seamlessly across all screens. This was particularly useful for my setup, where I often had multiple monitors in use.
As I continued experimenting with these settings, I realized that finding the right balance for Snap Layouts was a matter of personal preference. The feature could be incredibly useful in some situations, while in others, it might be more of a hindrance. By toggling the settings on and off and adjusting the options to suit my needs, I was able to strike the right balance that worked for me.
Ultimately, the key to managing Snap Layouts on Windows 11 is understanding the available settings and configuring them to match your workflow. Whether you need to enable the feature for efficient window management or disable it to reduce distractions, the process is straightforward once you know where to look. By taking the time to explore and adjust these settings, you can tailor your Windows 11 experience to better fit your needs and preferences.
Reflecting on my experience, I found that the Snap Layouts feature, while initially a bit confusing, became a valuable tool once I had control over its settings. It allowed me to optimize my workspace and manage my applications more effectively. Understanding how to enable or disable this feature was crucial in making my work environment more efficient and less frustrating.
