I found myself grappling with a frustrating issue when I needed to manage USB ports on my Windows 11 computer. It started when I was troubleshooting a series of inexplicable issues with peripheral devices—mice and keyboards randomly disconnecting, and external hard drives not being recognized. It became clear that managing USB ports could potentially resolve these problems. So, I set out to figure out how to enable or disable USB ports in Windows 11. Here’s how I tackled the challenge step by step.
Initially, I was unsure where to begin. I had a vague recollection of having seen USB settings in the Device Manager before, but I was not confident about how to proceed. I needed a structured approach, so I started by diving into Windows 11’s settings and Device Manager.
The first step was to open the Device Manager. I did this by right-clicking on the Start button and selecting ‘Device Manager’ from the menu. Device Manager is a utility that provides a comprehensive view of all the hardware connected to your computer, and it’s where you can manage devices, including USB ports.
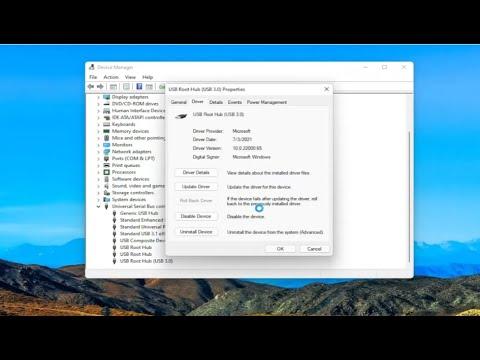
In Device Manager, I navigated to the section labeled ‘Universal Serial Bus controllers.’ This section lists all the USB controllers and hubs connected to your computer. Expanding this section, I saw several entries, including ‘USB Root Hub’ and ‘Generic USB Hub.’ These are the components that control the USB ports on my machine.
To disable a USB port, I right-clicked on one of the ‘USB Root Hub’ entries and selected ‘Disable device’ from the context menu. A warning prompt appeared, asking if I was sure I wanted to disable the device. I confirmed the action, and the selected USB port was disabled. I noticed immediately that the USB devices connected to that port stopped functioning, which confirmed that the port had been successfully disabled.
To enable a USB port, I followed a similar process. I right-clicked on the same ‘USB Root Hub’ entry, but this time, I selected ‘Enable device.’ The port was reactivated, and my previously disconnected USB devices started working again. It was straightforward once I got the hang of it.
However, I wanted to be cautious. Disabling USB ports can have unintended side effects, especially if you’re not entirely sure which port controls which device. I made a point of documenting which USB controllers corresponded to which ports by noting the changes in behavior of my USB devices as I enabled and disabled various ports.
Another aspect I explored was the BIOS/UEFI settings. Sometimes, managing USB ports directly through Windows isn’t enough, particularly if you’re dealing with more complex hardware configurations. To access BIOS/UEFI settings, I rebooted my computer and pressed the designated key (often F2, F10, or Delete) during the startup process. In the BIOS/UEFI menu, I looked for an option related to USB configuration. Here, I could enable or disable USB ports at a hardware level, which gave me more control over the USB functionality of my system.
If you’re dealing with a situation where USB ports are being disabled automatically by security policies or other system settings, you might need to check Group Policy settings. This can be done by opening the Local Group Policy Editor, which you can access by typing gpedit.msc in the Run dialog (opened by pressing Win+R). Under ‘Computer Configuration,’ I navigated to ‘Administrative Templates,’ then ‘System,’ and finally ‘Removable Storage Access.’ Here, I found various policies related to USB storage devices and could configure them to meet my needs.
I also considered using third-party software tools designed to manage USB ports. These tools offer additional features and a more user-friendly interface compared to the built-in Windows options. However, I decided to stick with the native Windows options for simplicity and reliability.
Throughout this process, I learned the importance of being methodical and documenting changes. Disabling and enabling USB ports can affect various devices and system functionalities, so keeping track of what I did and the outcomes helped me avoid confusion and potential issues.
In conclusion, managing USB ports in Windows 11 turned out to be a manageable task once I familiarized myself with the necessary tools and steps. By using Device Manager to enable or disable individual ports, accessing BIOS/UEFI settings for more granular control, and exploring Group Policy settings for advanced configurations, I successfully resolved my issues with USB devices. This approach not only fixed the immediate problems but also equipped me with the knowledge to handle similar issues in the future.
