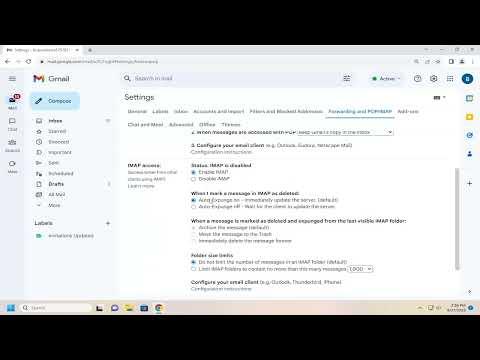
To enable POP and IMAP in your Gmail account, you’ll need to follow a few steps within Gmail’s settings. Here’s a step-by-step guide to help you through the process:
First, log in to your Gmail account using your preferred web browser. Once logged in, locate the gear icon in the top-right corner of the screen, which represents the settings menu. Click on this gear icon to reveal a drop-down menu, and then select “See all settings” to access the full settings page.
In the settings page, you’ll find several tabs at the top. Click on the “Forwarding and POP/IMAP” tab to access the relevant settings for enabling both POP and IMAP.
To enable IMAP, which allows you to access your Gmail account from multiple devices and keep emails synchronized across them, locate the “IMAP Access” section. Here, you’ll see an option that says “Enable IMAP.” Click on this option to enable IMAP access for your Gmail account. After selecting this option, be sure to scroll down to the bottom of the page and click “Save Changes” to apply the new settings.
Next, if you also want to enable POP access, which is used to download your emails to a local email client and manage them from there, find the “POP Download” section. In this section, you’ll see options for enabling POP. Select “Enable POP for all mail” if you want to allow access to all your emails, or “Enable POP for mail that arrives from now on” if you only want to enable access for emails received after you made this change.
Again, after making your selection, scroll down and click “Save Changes” to apply these settings. Enabling POP will allow you to configure a local email client or application to download and manage your Gmail messages.
Once you have enabled both POP and IMAP, you may need to configure your email client or application to connect to your Gmail account. Each email client will have its own settings and configuration steps, but generally, you’ll need to enter your Gmail address and password and configure the incoming and outgoing mail servers. For IMAP, the incoming server should be set to “imap.gmail.com” and the outgoing server to “smtp.gmail.com.” For POP, the incoming server should be “pop.gmail.com,” and the outgoing server remains “smtp.gmail.com.” Ensure that you use the correct ports and authentication settings as recommended by Google for a smooth connection.
By following these steps, you should be able to enable both POP and IMAP access for your Gmail account, allowing you to use various email clients and applications to manage your emails efficiently.
