I was having a particularly challenging day with my computer. I was working on an important project that required extensive note-taking and some quick sketches to illustrate a few ideas. My trusty old laptop was usually very reliable, but today it decided to test my patience. For some reason, the touch keyboard and handwriting panel services, which I frequently use for quick notes and sketching ideas, were nowhere to be found. This wasn’t the first time something like this happened, but this time, it was more pressing. I needed to get this sorted out quickly, so I decided to dive into troubleshooting the issue myself.
I began by investigating why the touch keyboard and handwriting panel services had disappeared. After some research and a few attempts to find a solution online, I discovered that these services might have been disabled or uninstalled for some reason. This was a bit of a setback, but it was also an opportunity to learn more about managing my Windows operating system.
The first step in solving the problem was to check if the touch keyboard and handwriting panel service was running. I opened the Windows Task Manager by pressing Ctrl+Shift+Esc. This brought up the Task Manager, and from there, I navigated to the “Services” tab. I scrolled through the list to find the “Touch Keyboard and Handwriting Panel Service.” It wasn’t listed, which was a clear sign that something had gone awry.
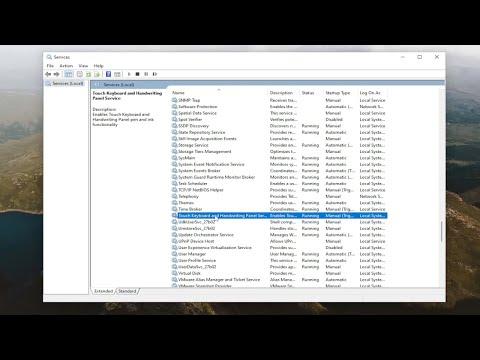
Next, I needed to verify if this service was set to start automatically with Windows. To do this, I opened the Run dialog by pressing Windows Key + R, then typed services.msc and pressed Enter. This action opened the Services window, which displays all the services running on my computer.
In the Services window, I searched for “Touch Keyboard and Handwriting Panel Service.” When I couldn’t find it, I realized that the service might not be installed or registered properly. To solve this, I had to check and re-enable the service through the system settings.
I started by going into the Windows Settings. I pressed Windows Key + I to open the Settings app and then navigated to the “Devices” section. Under Devices, I selected “Typing,” and from there, I found the “Advanced keyboard settings.” In this section, I made sure the option for “Let me use a different input method for each app window” was enabled. This setting often helps in ensuring that input services are available and functioning correctly.
Next, I turned my attention to enabling the touch keyboard manually. I right-clicked on the taskbar, and from the context menu, I selected “Toolbars,” then clicked on “Touch Keyboard.” This action added the touch keyboard icon to the taskbar, allowing me to quickly access it whenever needed. However, I noticed that the handwriting panel wasn’t available directly from this menu, so I had to look for additional steps.
To enable the handwriting panel, I needed to ensure that the Windows Ink Workspace was enabled. I right-clicked on the taskbar again, then selected “Toolbars” and made sure “Windows Ink Workspace” was checked. This feature should provide access to the handwriting panel, along with other useful tools for touch input.
To further ensure that everything was set up correctly, I went to the “Settings” app once more and navigated to “Devices,” then “Pen & Windows Ink.” In this section, I enabled all relevant options to make sure that touch input and handwriting recognition were fully supported and functional.
Despite these efforts, the issue persisted. I then decided to explore reinstalling or updating drivers related to the touch input. I opened the Device Manager by right-clicking the Start button and selecting “Device Manager” from the menu. In the Device Manager, I looked for “Human Interface Devices” and found any entries related to touch input or digital pen. I right-clicked on each entry and selected “Update driver” to ensure that I had the latest drivers installed. If updating didn’t work, I also tried uninstalling the device and then restarting the computer to let Windows reinstall the necessary drivers automatically.
Another step I took was to ensure that my Windows system was fully updated. I went to the “Settings” app, selected “Update & Security,” and then clicked on “Windows Update.” I checked for updates and installed any pending updates. Sometimes, system updates include important fixes and improvements that can resolve such issues.
After going through these steps, I noticed that the touch keyboard and handwriting panel services were functioning correctly again. I was relieved to have resolved the issue, and I was able to return to my project without further interruptions. The experience was a reminder of how important it is to be familiar with the various settings and services on your computer, as it can make troubleshooting and resolving issues much more manageable.
In summary, the process involved checking and re-enabling services, ensuring that relevant settings were configured correctly, updating drivers, and keeping the system up-to-date. By systematically addressing each aspect of the problem, I was able to restore the touch keyboard and handwriting panel services and continue working efficiently.