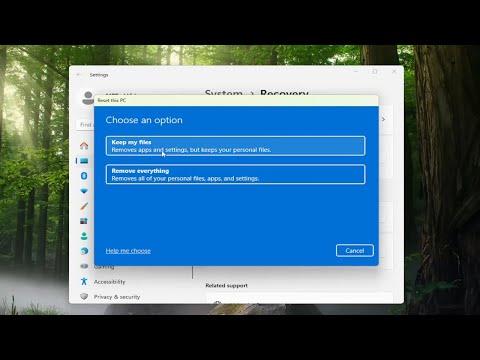
When I found myself grappling with persistent issues on my Windows 11 machine, I decided it was time for a fresh start. The computer was running slower than usual, and software conflicts were becoming a headache. After some research, I figured that performing a factory reset might be the best solution to restore the system to its original state. If you’re in a similar situation, here’s how I went about resetting my Windows 11 back to its factory settings.The first step was to back up all my important files. I knew that a factory reset would wipe everything on my computer, so I took time to ensure that no important data would be lost in the process. I transferred all crucial documents, photos, and other files to an external hard drive. Additionally, I made sure that any application-specific data that I might need later was also backed up. Once I was confident that all my data was safe and secure, I was ready to proceed with the reset.Navigating the reset process on Windows 11 is straightforward once you know where to go. I started by clicking on the Start button located at the bottom left of the screen. From there, I opened the Settings app by selecting the gear icon. This is where I found the crucial option for resetting my PC.In the Settings menu, I chose the ‘System’ category from the sidebar. Within this section, there’s an option labeled ‘Recovery’. Clicking on this took me to a screen with several recovery options, but the one I was interested in was ‘Reset this PC’. I clicked on the ‘Reset PC’ button to begin the process.I was then prompted to choose between two options: ‘Keep my files’ or ‘Remove everything’. Since my goal was to return the PC to its factory settings, I selected ‘Remove everything’. This option would remove all personal files, applications, and settings, essentially giving the computer a clean slate.The next step involved deciding how I wanted to reinstall Windows 11. I was given two options: ‘Cloud download’ or ‘Local reinstall’. I opted for ‘Cloud download’ because it ensured that I would get the latest version of Windows 11. However, this choice requires a stable internet connection and may take longer than the ‘Local reinstall’ option, which uses the existing files on my computer.After making this choice, I was presented with a final confirmation screen summarizing what would happen during the reset. It was crucial to review this information carefully to make sure I understood that all my files and settings would be erased. Once I confirmed that I was ready to proceed, I clicked on ‘Next’ and then ‘Reset’.The reset process began immediately, and the computer restarted to initiate the procedure. It took some time, and the system restarted several times during the process. I made sure not to interrupt it, letting the computer do its job. During this period, my PC was essentially working to remove everything and reinstall a fresh copy of Windows 11.After the reset was complete, the computer booted up to the Windows 11 setup screen. Here, I followed the prompts to set up the system as if it were a new computer. This included selecting my region and keyboard layout, connecting to a Wi-Fi network, and signing in with my Microsoft account.Once I completed the setup process, Windows 11 was ready to use, restored to its factory settings. I reinstalled any necessary applications and restored my files from the backup I had created earlier. This fresh start helped resolve the issues I had been experiencing, and the system ran smoothly once again.Performing a factory reset can be a powerful solution for various issues, but it’s essential to be prepared and ensure that you have backed up all important data before proceeding. By following these steps, I was able to restore my Windows 11 computer to its original state and address the performance problems that had been troubling me.
How to Factory Reset Windows 11 Back to Factory Settings [Guide]
