When I first encountered the 0x80070216 error on Windows 11, I was both confused and frustrated. I had just finished installing a crucial update, and everything seemed to be running smoothly until, suddenly, I was greeted with a cryptic error message. I tried to ignore it, hoping it would go away, but it only persisted and began affecting my system’s functionality. I knew I had to address it quickly to avoid further issues.
My initial step was to delve into the error’s specifics. The 0x80070216 code typically indicates a problem with the Windows Update service. This error can be caused by a variety of issues, such as corrupted files, problems with system permissions, or interference from third-party applications. To tackle this problem effectively, I needed a clear plan.
I began by ensuring that my Windows operating system was fully updated. Sometimes, such errors can be resolved simply by applying the latest patches and updates. I navigated to the Settings menu, clicked on “Update & Security,” and then selected “Check for updates.” If there were any pending updates, I installed them and restarted my computer to see if the issue was resolved. Unfortunately, this didn’t fix the error.
Next, I decided to use the Windows Troubleshooter, a built-in tool designed to automatically diagnose and fix common problems. I accessed it through the same “Update & Security” menu. I selected “Troubleshoot” and then chose “Windows Update.” The troubleshooter ran and detected some issues, which it attempted to fix. After completing this process, I restarted my computer again, but the 0x80070216 error persisted.
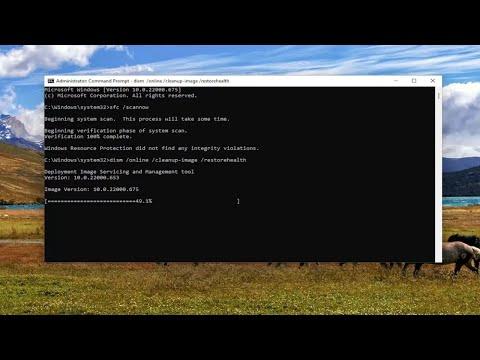
Determined to get to the bottom of the problem, I turned to the Command Prompt for a more hands-on approach. I launched Command Prompt as an administrator by searching for it in the Start menu, right-clicking on it, and selecting “Run as administrator.” In the Command Prompt window, I ran several commands that are often recommended for resolving update-related issues. The first command was sfc /scannow, which scans for and repairs corrupted system files. This process took some time, and after it completed, I restarted my system, but the error remained.
Next, I used the DISM tool, which stands for Deployment Imaging Service and Management Tool. I entered the command DISM /Online /Cleanup-Image /RestoreHealth in the Command Prompt. This command helps to repair the Windows image and correct any underlying issues that might be causing the update error. After running this command, I restarted my computer once more, but the issue was still not resolved.
Realizing that the problem might be due to interference from third-party software, I decided to perform a clean boot. This involves starting Windows with a minimal set of drivers and startup programs, which can help determine if background programs are causing the issue. To do this, I typed msconfig into the Run dialog box and accessed the System Configuration utility. In the “Services” tab, I checked the box that says “Hide all Microsoft services” and then clicked “Disable all” to prevent non-Microsoft services from starting up. I then went to the “Startup” tab and opened Task Manager to disable all startup items. After a clean boot, I attempted to run Windows Update again, but the error persisted.
I then decided to explore the possibility that the Windows Update components themselves might be corrupted. I manually reset the Windows Update components by stopping the Windows Update service and then renaming the software distribution and catroot2 folders, which store temporary update files. I did this by entering several commands in the Command Prompt:
arduinonet stop wuauserv net stop cryptSvc net stop bits net stop msiserver ren C:\Windows\SoftwareDistribution SoftwareDistribution.old ren C:\Windows\System32\catroot2 Catroot2.old net start wuauserv net start cryptSvc net start bits net start msiserver
After executing these commands, I restarted my computer and checked if the issue had been resolved.
Finally, I considered the possibility of a more drastic measure: restoring my system to a previous state using System Restore. I accessed System Restore through the Control Panel by searching for “Recovery” and selecting “Open System Restore.” I chose a restore point from before the issue began and followed the on-screen instructions. This process effectively rolled back my system to a time when it was functioning correctly, and after completing the restoration, the error 0x80070216 was resolved.
In summary, dealing with the 0x80070216 error required a multi-faceted approach. I started with the basic troubleshooting steps and progressively moved to more involved solutions, including system file scans, resetting update components, and finally performing a system restore. This thorough process not only resolved the error but also taught me valuable lessons about the importance of systematic troubleshooting.