I remember the exact moment when everything seemed to go wrong. It was a quiet evening, and I was engrossed in an important project on my Windows 11 laptop. Suddenly, without warning, the screen went black, and a blue screen appeared with the ominous error code 0x135. My heart sank as I realized I was staring at a Blue Screen of Death (BSOD). The abrupt interruption was frustrating and disheartening, especially since I was in the middle of a crucial task.
My first instinct was to panic, but I knew that wasn’t going to help. I took a deep breath and decided to tackle the problem methodically. The BSOD error code 0x135 can be quite intimidating, but with a clear approach, it’s manageable.
The initial step I took was to reboot the laptop. Sometimes, a simple restart can resolve temporary glitches or conflicts that cause a BSOD. I powered off the laptop completely and then turned it back on, hoping that it might just be a transient issue. However, upon restarting, the BSOD appeared again, which confirmed that the problem was more persistent.
Next, I turned my attention to the specifics of the error code. The 0x135 error code typically indicates a problem related to a driver or a system file. To address this, I needed to delve deeper into the system’s health and stability.
The first thing I did was to enter Safe Mode. To do this, I restarted my laptop and continuously pressed the F8 key during startup. This action brought up the Advanced Boot Options menu, where I selected Safe Mode. Safe Mode is a diagnostic mode that starts Windows with only the essential drivers and services, which could help me determine if the issue was caused by any third-party applications or drivers.
Once in Safe Mode, I opened the Device Manager by right-clicking the Start button and selecting “Device Manager” from the menu. I checked for any warnings or errors next to the device drivers. In my case, there was a yellow exclamation mark next to the graphics driver. This indicated that there might be an issue with the driver that could be causing the BSOD.
To address the driver issue, I decided to update the driver. I right-clicked the graphics driver and selected “Update driver.” Windows then searched for the latest driver updates online. After the update process, I rebooted the laptop normally, hoping that the problem was resolved. Unfortunately, the BSOD appeared again, which meant that the issue was not solely related to the graphics driver.
The next logical step was to run a System File Checker (SFC) scan. This tool helps to identify and repair corrupted system files that might be causing stability issues. To run the SFC scan, I opened Command Prompt as an administrator by searching for “cmd” in the Start menu, right-clicking on “Command Prompt,” and selecting “Run as administrator.” In the Command Prompt window, I typed sfc /scannow and pressed Enter. The system began scanning for corrupted files, and it took some time to complete. Once the scan finished, it reported that some files were repaired, which gave me hope that this might solve the BSOD problem.
After completing the SFC scan, I restarted my laptop once more. To my disappointment, the BSOD still appeared. At this point, I realized that the issue might be more complex, potentially involving system settings or updates.
I then turned to Windows Update to ensure that my system was fully up-to-date. I navigated to Settings > Update & Security > Windows Update and checked for any available updates. I installed all pending updates and restarted the laptop. Keeping Windows updated is crucial, as updates often contain fixes for known issues and bugs that could be causing system crashes.
Another approach I considered was rolling back recent updates or drivers. If the BSOD issue started occurring after a recent update, it might be worth rolling back to a previous version. I accessed the update history through Settings > Update & Security > Windows Update > View update history. Here, I could uninstall recent updates or drivers that might have triggered the BSOD.
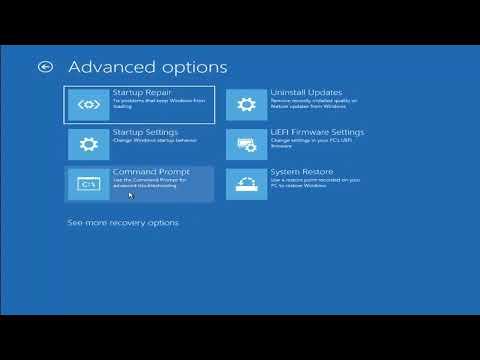
As a last resort, I performed a system restore. System Restore allows you to revert your computer’s system files, installed applications, and settings to a previous state. I accessed System Restore by typing “Create a restore point” in the Start menu search bar, selecting “System Properties,” and then clicking on “System Restore.” I chose a restore point from before the issue started and followed the prompts to complete the process.
After the system restore, I restarted my laptop one final time. This time, the BSOD with error code 0x135 did not appear. It seemed that one or more of the steps I had taken had resolved the issue. I was relieved and elated that I could return to my work without further interruptions.
Dealing with a BSOD can be incredibly frustrating, but taking a systematic approach to troubleshoot the problem can lead to a successful resolution. Each step I took, from rebooting and updating drivers to running scans and performing system restores, played a crucial role in addressing the issue. In the end, patience and persistence were key to overcoming the BSOD with error code 0x135.