I recently encountered a frustrating issue with my Windows 10 computer. While working on important tasks, I noticed that the performance had significantly slowed down. My CPU usage was constantly high, even when I wasn’t running any intensive applications. I decided to dig deeper into the problem, and that’s when I discovered that Microsoft Compatibility Telemetry was the culprit.
Microsoft Compatibility Telemetry is a service designed to collect and send data about how Windows is performing and to help Microsoft improve the operating system. It gathers information about software and hardware compatibility issues, which is supposed to help in enhancing user experience and fixing bugs. However, when this service consumes too many resources, it can seriously impact your computer’s performance.
Initially, I was unsure of how to address the issue. I tried restarting my computer and closing unnecessary applications, but nothing seemed to make a difference. The CPU usage remained stubbornly high, which was both irritating and disruptive to my workflow. So, I started to look for solutions that could help mitigate or resolve this problem.
After researching online and going through various forums, I discovered several methods that could potentially solve the high CPU usage issue caused by Microsoft Compatibility Telemetry. Here’s how I tackled the problem step-by-step.
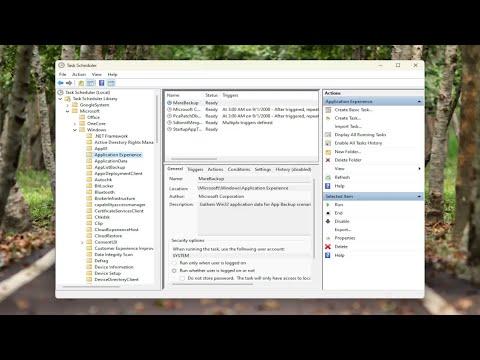
Firstly, I decided to check the Task Scheduler for any tasks related to Microsoft Compatibility Telemetry. The Task Scheduler is a Windows utility that allows you to automate certain tasks and processes. I accessed it by typing “Task Scheduler” into the Start menu search bar and selecting the application. In the Task Scheduler, I navigated to Task Scheduler Library > Microsoft > Windows > Application Experience. Here, I found a task named “Microsoft Compatibility Telemetry.” I right-clicked on it and selected “Disable” to prevent it from running.
Disabling the task seemed to provide immediate relief. My CPU usage dropped noticeably, and my computer’s performance improved. However, I wanted to make sure that this was a sustainable solution and that the telemetry service wouldn’t cause issues in the future.
Next, I decided to modify the Group Policy settings to further control the data collection. I accessed the Group Policy Editor by typing “gpedit.msc” into the Start menu search bar. Once inside, I navigated to Computer Configuration > Administrative Templates > Windows Components > Data Collection and Preview Builds. Here, I located the policy named “Allow Telemetry.” I double-clicked on it and selected “Disabled.” This setting effectively stops the telemetry data collection service from sending information to Microsoft, thereby reducing its impact on system resources.
After making these changes, I restarted my computer to ensure that the new settings took effect. The performance improvements were clear. However, I also wanted to make sure that I was not compromising my system’s security or functionality. So, I reviewed the changes I made and confirmed that disabling telemetry would not affect critical system updates or support.
Additionally, I decided to adjust some of my system’s performance settings to further optimize its operation. I accessed the System Properties by right-clicking on “This PC” and selecting “Properties.” Then, I clicked on “Advanced system settings” and navigated to the “Performance” section. Here, I chose “Adjust for best performance” to disable some of the visual effects that were using up resources. This simple adjustment helped to free up additional CPU capacity and improved overall system responsiveness.
I also ran a thorough scan of my system using an antivirus tool to ensure that there were no underlying malware issues contributing to the high CPU usage. It’s always a good idea to rule out any other potential causes of performance problems. After the scan, my system was clean, which confirmed that the high CPU usage was indeed due to the Microsoft Compatibility Telemetry service.
In summary, by disabling the task related to Microsoft Compatibility Telemetry in Task Scheduler, adjusting the Group Policy settings to disable telemetry, and optimizing system performance settings, I was able to significantly reduce CPU usage and improve my computer’s performance. These steps not only resolved the immediate issue but also helped me maintain a smoother and more efficient workflow. If you find yourself facing a similar problem, I would recommend trying these methods to see if they work for you. It’s always a good idea to monitor your system’s performance and make adjustments as needed to keep everything running smoothly.
