I recently encountered a perplexing issue with my Windows 11 system. I had been working on a critical project, and just when I was about to wrap things up, I noticed a notification that a Windows update was available. Eager to ensure my system was up-to-date and secure, I proceeded to start the update. However, instead of the usual progress, I was met with an error code: 0x8024a203. Frustrated, I delved into finding a solution to this problem, which seemed to have no immediate resolution.
The error 0x8024a203, as I soon discovered, typically points to problems with the Windows Update components or issues related to system files. I decided to tackle the issue methodically, starting with some basic troubleshooting steps. The first thing I did was restart my computer. While this may seem like a simplistic approach, restarting can often resolve many transient issues by refreshing the system state.
After the restart didn’t solve the problem, I moved on to the next step, which was to run the Windows Update Troubleshooter. Windows has built-in tools designed to fix update-related issues automatically. To access this tool, I navigated to Settings, then went to Update & Security, and selected Troubleshoot. From there, I chose the Windows Update troubleshooter and let it run. This tool scans for common problems and applies fixes as needed. Unfortunately, this step did not resolve the error, so I had to dig deeper.
The next logical step was to check and reset the Windows Update components manually. I opened Command Prompt as an administrator and executed a series of commands to stop and restart the Windows Update services. Specifically, I ran commands to stop the services, rename the SoftwareDistribution and Catroot2 folders (which are where update files are stored), and then restart the services. Here are the commands I used:
net stop wuauservnet stop cryptSvcnet stop bitsnet stop msiserverren C:\Windows\SoftwareDistribution SoftwareDistribution.oldren C:\Windows\System32\catroot2 Catroot2.oldnet start wuauservnet start cryptSvcnet start bitsnet start msiserver
Running these commands helped reset the update components and clear out any corrupt files that might have been causing the issue. After executing these commands, I attempted to run Windows Update again. This time, the update process started without presenting the 0x8024a203 error. It appeared that resetting the update components was a crucial step in resolving the issue.
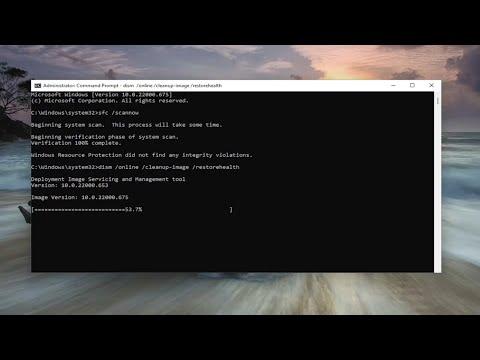
However, if manual troubleshooting did not resolve the error, I was prepared to take further measures. I had read about the System File Checker tool (sfc /scannow), which can fix corrupted system files. To use this tool, I opened Command Prompt as an administrator and typed sfc /scannow. The system then scanned for corrupted files and repaired them if possible. Running this scan was a crucial step in ensuring that the underlying system files were not causing the update failure.
Another method I considered was using the Deployment Imaging Service and Management Tool (DISM). This tool can fix Windows image issues that might be affecting the update process. I ran the following commands in Command Prompt as an administrator:
DISM /Online /Cleanup-Image /CheckHealthDISM /Online /Cleanup-Image /ScanHealthDISM /Online /Cleanup-Image /RestoreHealth
Each command performed different levels of health checks and repairs on the Windows image. After running these commands, I restarted my computer and attempted the update once more.
In summary, dealing with Windows Update error 0x8024a203 required a combination of basic and advanced troubleshooting steps. Starting with a simple restart, progressing through built-in troubleshooters, and finally manually resetting update components and repairing system files helped me resolve the issue. The ultimate lesson learned from this experience was the importance of systematically addressing potential problems rather than jumping to conclusions. With patience and persistence, I was able to overcome the error and successfully complete the update process.