I recently faced a frustrating problem with my WiFi connection. Despite having a dual-band router that supports both 2.4GHz and 5GHz frequencies, my Windows 11 laptop stubbornly preferred the 2.4GHz band. This resulted in slower speeds and inconsistent connectivity, particularly when I was streaming videos or working from home. My aim was to force my laptop to connect to the 5GHz band, which promised faster speeds and a more stable connection. Here’s how I tackled the issue.
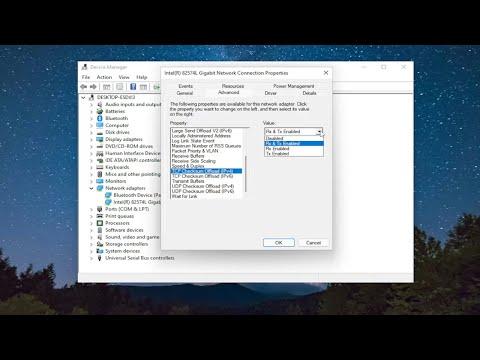
First, I needed to verify that my laptop actually supported the 5GHz band. Windows 11 provides a straightforward way to check this. I went to the Device Manager by right-clicking the Start button and selecting “Device Manager” from the menu. In Device Manager, I expanded the “Network adapters” section and located my WiFi adapter. Right-clicking on it, I chose “Properties” and went to the “Advanced” tab. Under “Property,” I searched for “Wireless Mode” or a similar option, which listed supported frequencies. My adapter supported 5GHz, so I proceeded with the next steps.
The next step was to adjust the settings in my router to ensure it was properly broadcasting the 5GHz band. I accessed my router’s settings by typing its IP address into my web browser’s address bar. This address was typically something like 192.168.1.1 or 192.168.0.1. After logging in with the router’s credentials, I navigated to the wireless settings section. Here, I ensured that the 5GHz band was enabled and set to broadcast with a distinct SSID (network name) different from the 2.4GHz band. This distinction would make it easier to select the 5GHz network from my laptop.
Once I confirmed that the router was properly set up, I focused on configuring my laptop. I went back to the Device Manager and right-clicked on my WiFi adapter again, selecting “Properties.” In the “Advanced” tab, I looked for an option labeled “Preferred Band” or something similar. I set this to “5GHz” if available. If this option wasn’t present, I moved on to the next step: creating a new network profile.
To create a new network profile that specifically connects to the 5GHz band, I accessed the “Network & Internet” settings from the Windows 11 settings menu. I clicked on “WiFi” and then on “Manage known networks.” I removed the existing network profile for my WiFi by selecting it and clicking “Forget.” Afterward, I scanned for available networks and connected to the 5GHz band’s SSID that I had set up on my router. I entered the correct password and made sure the connection was established.
Still, I faced some issues as my laptop seemed to prefer reconnecting to the 2.4GHz band occasionally. To address this, I used the Command Prompt to ensure that my WiFi settings were optimized for the 5GHz band. I opened Command Prompt as an administrator and entered the command netsh wlan show interfaces. This command displayed details about my current WiFi connection, including the band in use. I checked if it was connected to the 5GHz band. If it wasn’t, I manually disconnected and reconnected to the 5GHz SSID.
In cases where the above steps did not resolve the issue, I updated my WiFi driver to the latest version. I returned to Device Manager, right-clicked on my WiFi adapter, and selected “Update driver.” I chose the option to search automatically for updated driver software. Updating the driver sometimes resolved compatibility issues that might be preventing a stable connection to the 5GHz band.
As a last resort, I checked for any Windows updates that could address known issues with WiFi connectivity. I went to the “Update & Security” settings, clicked on “Windows Update,” and checked for updates. Installing any pending updates ensured that my operating system was up-to-date with the latest fixes and improvements.
By carefully following these steps, I was able to force my Windows 11 laptop to consistently connect to the 5GHz band, which significantly improved my internet speed and connection stability. This process involved a mix of adjusting router settings, configuring laptop settings, and performing system updates. It was a bit of trial and error, but ultimately, I achieved the faster and more reliable WiFi connection I needed.