I remember the first time I encountered the issue of cluttered labels in my Gmail inbox. It was a particularly busy day, and I was juggling multiple projects. My Gmail account had accumulated an excessive number of labels over time. Some were from old projects, while others were automatically generated by filters I had set up. The result was a chaotic sidebar that made it difficult to focus on the important emails. I needed a way to declutter my inbox and make my Gmail experience more manageable.
The problem started when I realized that every time I added a new label or created a filter, it would appear in the left sidebar, regardless of how relevant it was to my current work. I had a mix of labels ranging from personal to work-related, and the sheer volume of them was overwhelming. Each time I tried to find a specific email, I had to navigate through a maze of labels, which was both time-consuming and frustrating.
I started searching for solutions to this problem and found that Gmail’s interface, while feature-rich, could be a bit overwhelming if you weren’t careful. After some research, I discovered that Gmail provides several methods to hide or manage labels to streamline the user experience. Here’s a step-by-step guide on how I tackled this issue and successfully hid the labels that were cluttering my sidebar.
First, I needed to identify which labels were essential and which ones were no longer needed. I went through my label list and made a note of which labels I actively used and which ones were redundant. This was an important first step because it helped me focus on the labels that truly mattered.
Next, I decided to take advantage of Gmail’s built-in label management features. To start, I logged into my Gmail account and looked at the left sidebar where all my labels were displayed. I found that Gmail allows you to hide labels from the sidebar, which was exactly what I needed.
To hide labels, I clicked on the small arrow next to the label’s name. This action opened a dropdown menu with various options. I selected “Hide” for the labels I no longer needed to see regularly. This action was straightforward, but I found that Gmail also allows you to customize how labels appear based on your preferences.
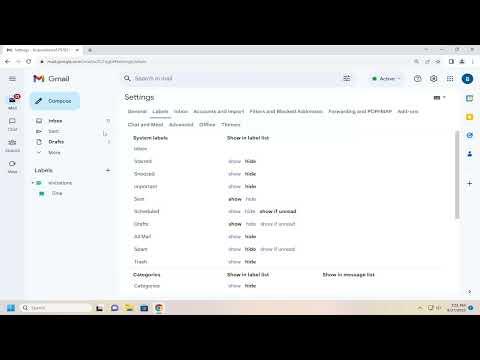
I went to Gmail’s settings by clicking on the gear icon in the upper right corner of the screen. From there, I selected “See all settings,” which took me to a more detailed configuration page. In the settings menu, I navigated to the “Labels” tab. This tab provided me with a comprehensive overview of all my labels and their settings.
In the “Labels” tab, I could see a list of all my labels along with options to show or hide them in the sidebar. I reviewed each label and used the “Hide” option for those that were not necessary to have visible at all times. This approach allowed me to keep my sidebar uncluttered and focused on the labels that were most relevant to my current work.
One useful feature I discovered was the ability to manage labels through the “Manage labels” option. This feature allowed me to access a detailed view of each label and customize its visibility. For labels that I only needed occasionally, I chose to hide them from the sidebar but kept them accessible through the “More” section, which can be expanded as needed. This method provided a clean and organized sidebar without permanently removing any labels.
Additionally, I realized that I could further customize the label visibility settings for individual labels. By clicking on the “Edit” button next to each label, I was able to adjust the label’s settings and choose whether it should appear in the label list or not. This flexibility was particularly useful for managing labels that I used sporadically but didn’t want cluttering my sidebar.
Another important step was to ensure that I reviewed and updated my filters. Filters in Gmail can automatically apply labels to incoming emails. If I had filters set up that were applying labels I no longer needed, it was time to adjust them. I accessed the “Filters and Blocked Addresses” tab in Gmail’s settings and reviewed each filter. I updated or removed filters that were assigning labels that I had decided to hide.
Through these steps, I successfully managed to declutter my Gmail sidebar and hide unnecessary labels. My inbox became more organized, and I was able to focus more on my important emails without the distraction of a cluttered label list.
In conclusion, dealing with a cluttered Gmail sidebar can be overwhelming, but Gmail’s label management features provide effective solutions. By carefully selecting which labels to hide and managing filter settings, I was able to streamline my Gmail experience and improve my productivity. If you’re struggling with a similar issue, I encourage you to follow these steps and customize your label settings to fit your needs. It made a significant difference in my email management and I’m sure it can help you as well.