I vividly remember the day I stumbled upon the need to insert 3D models into a Microsoft Word document. It was a crucial moment during a project presentation I was preparing for my team at work. I had been tasked with creating a comprehensive report that not only included textual descriptions and diagrams but also visually engaging elements to clearly illustrate complex data. I had this brilliant idea to incorporate 3D models to make the report more interactive and insightful. Little did I know that my journey to achieve this simple task would turn into a bit of a challenge.
Initially, I assumed inserting a 3D model into a Word document would be straightforward, like adding an image or a chart. I started by opening Microsoft Word and going straight to the “Insert” tab on the ribbon, expecting to find a simple option for 3D models. To my dismay, there was no obvious way to include 3D elements. I began to feel a twinge of frustration, but I knew I had to solve this problem to ensure my report stood out.
My first step was to consult the help feature within Word and search online for guidance. I found out that inserting 3D models into Word is indeed possible, but it’s not as intuitive as inserting other types of objects. The key to this process lies in knowing where to find the right tools and how to use them effectively.
Here’s how I eventually managed to insert 3D models into my document, step by step.
First, I made sure that I was using Microsoft Word 2016 or later, as support for 3D models is available starting from this version. If you’re using an older version of Word, you’ll need to upgrade or find an alternative method to include 3D models.
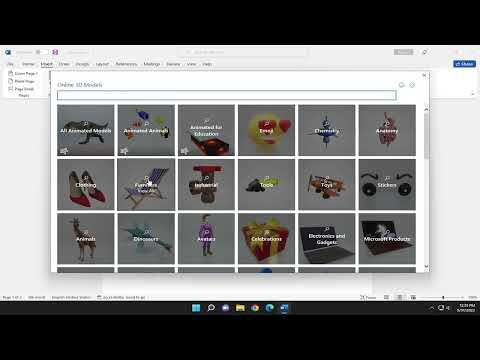
Once I confirmed that I had the correct version of Word, I went to the “Insert” tab on the Ribbon. This is where the journey began to feel less complicated. I looked for the “3D Models” button, which is typically located in the “Illustrations” group. Clicking on this button, I was presented with a few options.
I could choose to insert a 3D model from “This Device” if I had a 3D file saved locally on my computer. Alternatively, I could select “Stock 3D Models” to access a library of pre-made models available through Microsoft’s 3D model collection. Since I didn’t have a specific 3D model ready and needed something that could represent the data effectively, I opted for the “Stock 3D Models” option.
A search box appeared, allowing me to type in keywords related to the model I was looking for. I typed in relevant terms related to my project, such as “building” or “product design,” and browsed through the available models. Each model had a preview, which helped me decide on the most appropriate one for my report.
After selecting the 3D model that suited my needs, I clicked on “Insert,” and the model appeared in my Word document. At this point, I realized that inserting a 3D model is just the beginning. I needed to adjust and format it to fit seamlessly into my document.
I resized and repositioned the model by clicking on it to reveal the sizing handles and dragging them to the desired size. I also used the rotation handles to adjust the model’s orientation so that it was displayed in the most effective way possible. To further customize the appearance, I right-clicked on the model and selected “Format 3D Model.” This option allowed me to access various formatting tools, such as changing the color, adding shadows, and adjusting the lighting to make the model look more dynamic and integrated into my document.
One of the coolest features I discovered was the ability to animate the 3D model. By selecting the model and navigating to the “3D Model Tools” on the Ribbon, I could choose different animations like “Turntable” or “Jumping” that made the model rotate or bounce in an engaging manner. This feature was particularly useful for highlighting specific aspects of the model and making the presentation more interactive.
Throughout this process, I also made sure to save my work frequently to avoid losing any progress. Inserting and formatting 3D models can sometimes be tricky, and it’s easy to make changes that require adjustments, so saving often is a good practice.
Once I was satisfied with the placement and appearance of the 3D model, I reviewed the document as a whole to ensure that everything was cohesive. I checked that the model did not disrupt the flow of text and that it was positioned in a way that complemented the surrounding content.
Finally, I saved the document in the appropriate format and prepared it for presentation. When I shared the report with my team, they were impressed with the interactive 3D elements that made the data more tangible and easier to understand.
Reflecting on the experience, I realized that although inserting 3D models into Microsoft Word took some initial effort and experimentation, the end result was worth it. The 3D models significantly enhanced the visual appeal of the report and provided a clearer representation of complex information. This process not only helped me solve the immediate challenge but also equipped me with a valuable skill for future projects.
