I remember the day clearly; I had just finished working on a crucial report for my boss, and I was about to convert the document to a PDF format for submission. Everything seemed to be going smoothly until I encountered an unexpected problem. When I tried to print the document to PDF, I realized that the Microsoft Print to PDF option was missing from my list of printers. Panic set in as I scrambled to find a solution. This wasn’t the first time I’d faced issues with printing on Windows, but this one felt particularly frustrating because it involved a built-in feature that I had used numerous times before.
At first, I tried restarting my computer, hoping it would resolve the issue. Unfortunately, the Microsoft Print to PDF option still didn’t appear. I then searched online for a solution, and that’s when I discovered that this is a relatively common problem with Windows 10 and 11. Many users had faced the same issue and had various solutions to offer. I decided to dive into the troubleshooting process myself, aiming to fix the problem so I could complete my task without any more delays.
The first step I took was to open the Settings app on my Windows 11 computer. I clicked on the Start menu and selected the gear icon to access the Settings. In the Settings window, I navigated to “Devices” and then clicked on “Printers & scanners.” I was hoping that the Microsoft Print to PDF option would be listed there, but to my dismay, it wasn’t.
Determined to solve this, I went ahead and clicked on “Add a printer or scanner.” The system searched for available printers, but it didn’t find Microsoft Print to PDF. I then realized that I might need to manually add it. To do this, I returned to the Settings menu and clicked on “Printers & scanners” again. This time, I scrolled down to the “More printers” section and selected “The printer that I want isn’t listed.”
A new window popped up with several options. I chose “Add a local printer or network printer with manual settings.” This seemed to be the right choice since I needed to add a specific printer that wasn’t showing up automatically. I clicked “Next” to proceed with the setup.
In the next window, I was prompted to choose a port. Since Microsoft Print to PDF is a virtual printer, I selected “PORTPROMPT:” which is a generic port used for such purposes. After selecting the port, I clicked “Next.”
Now came the crucial part: choosing the printer driver. I was looking for Microsoft Print to PDF in the list of available drivers. To my relief, it was listed under “Microsoft” as “Microsoft Print to PDF.” I selected it and clicked “Next.”
The next step involved naming the printer. I kept the default name “Microsoft Print to PDF,” but you could rename it if you preferred. After entering the name, I clicked “Next” to continue. I was then asked whether I wanted to set this printer as the default printer. Since this was a virtual printer, I chose not to set it as the default and clicked “Next.”
Finally, I was prompted to print a test page. I clicked “Finish” to complete the installation. Once the installation was complete, I checked my list of printers and scanners, and there it was—Microsoft Print to PDF was back on the list.
To make sure everything was working correctly, I opened the report I had been working on and tried to print it to PDF again. I selected Microsoft Print to PDF from the list of printers, adjusted the settings as needed, and clicked “Print.” The dialog box appeared, asking where I wanted to save the PDF file. I chose the appropriate location, named the file, and clicked “Save.” The PDF was successfully created, and I was relieved that the issue had been resolved.
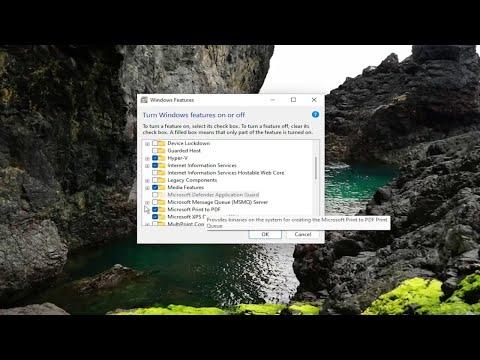
In case the printer still didn’t appear for you after these steps, there are a few additional troubleshooting tips. Sometimes, reinstalling the feature might help. To do this, you can go to “Turn Windows features on or off” from the Control Panel, uncheck “Microsoft Print to PDF,” restart your computer, and then go back to re-enable it.
Another approach is to use the Windows Troubleshooter for printers. You can find this option in the Settings under “Update & Security” and then “Troubleshoot.” Select “Printer” and run the troubleshooter to see if it can detect and fix the issue automatically.
If all else fails, consider updating your Windows operating system to the latest version or checking for any pending updates that might address known issues with printer features.
Resolving the missing Microsoft Print to PDF issue required a bit of patience and persistence, but ultimately, it was a straightforward process once I followed the correct steps. The key takeaway for me was that even when a built-in feature seems to disappear, there are always methods to restore or reinstall it, and a bit of troubleshooting can go a long way in resolving such issues.