For as long as I can remember, I’ve always been a bit of a tinkerer when it comes to my computer. I like to push the boundaries of what my machine can handle and explore all the different settings and options available to optimize performance. Recently, though, I encountered a problem that left me scratching my head. I was running a particularly resource-intensive program—one that I needed for both work and personal projects. Everything seemed to be going well until I noticed that this program was consuming an exorbitant amount of CPU resources. It was making my system sluggish and unresponsive, and other tasks that I needed to complete were getting delayed because of this high CPU usage.
At first, I tried to ignore it, hoping that maybe the problem would resolve itself. I closed unnecessary applications, restarted my computer, and even tried to limit the program’s workload within its own settings. Unfortunately, none of these steps seemed to work. The CPU usage remained high, and it became increasingly clear that I needed to take more direct action.
Determined to find a solution, I started researching ways to limit the CPU usage of a program in Windows. After a fair amount of digging and experimentation, I discovered a series of methods that allowed me to control how much CPU power my program could use. These methods were relatively straightforward, and they made a significant difference in how my computer performed. I’m excited to share what I learned, as it might help others who find themselves in a similar situation.
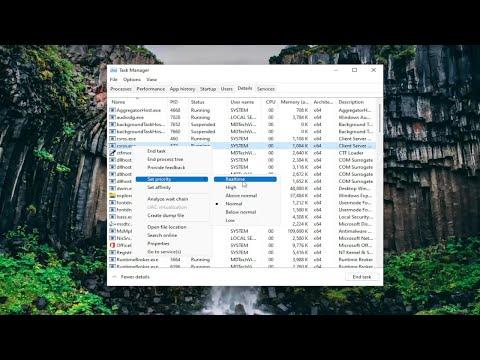
One of the first things I tried was adjusting the priority level of the program through Task Manager. This built-in tool in Windows provides a way to view and manage the processes running on your computer. To access Task Manager, I pressed Ctrl + Shift + Esc, which brought up the Task Manager window. Under the “Processes” tab, I found the program that was consuming too much CPU power. Right-clicking on it, I selected “Go to details,” which took me to the “Details” tab where I could see more granular information about the process.
From here, I right-clicked on the process again and chose “Set affinity.” This option allowed me to specify which CPU cores the program could use. By limiting the program to only a few cores, I hoped to reduce its overall CPU usage. I found that restricting the program to a single core sometimes helped, though it wasn’t a perfect solution. It could be effective for programs that are designed to use multiple cores but tend to dominate the CPU resources.
While adjusting affinity helped to some extent, it wasn’t always a perfect fix. Another method I explored involved using the Resource Monitor, a more detailed tool also available within Windows. To access Resource Monitor, I opened Task Manager again and navigated to the “Performance” tab. From there, I clicked on “Open Resource Monitor” at the bottom. In Resource Monitor, I could see detailed information about CPU usage, including which programs were consuming the most resources.
One of the useful features of Resource Monitor is the ability to set CPU priority for specific processes. By adjusting the priority level, I could influence how much CPU time the program received relative to other processes. While this didn’t directly limit the CPU usage to a specific percentage, it did help manage the distribution of CPU resources more effectively.
Despite these adjustments, I still wanted more control over the CPU usage. This led me to explore third-party applications designed for managing CPU resources. One such program I found was “BES,” a free tool that allows you to limit CPU usage for individual applications. BES works by periodically pausing the selected application to reduce its CPU consumption. It was a bit of a trial-and-error process to find the right settings, but once I configured BES properly, it helped keep the CPU usage within acceptable limits.
Another third-party tool that proved useful was “CPULimit.” This program works by limiting the CPU usage of a process through throttling. It’s a bit more technical and requires setting up a configuration file, but it offered a fine level of control over CPU consumption. I used CPULimit to create a configuration that capped the CPU usage of my program at a specific percentage, which significantly improved my system’s overall performance.
In addition to these software-based solutions, I also considered adjusting the program’s internal settings if possible. Some programs have built-in options to limit their CPU usage or adjust performance settings. Checking the program’s settings or documentation sometimes revealed options for reducing its resource footprint.
Throughout this process, I learned that there isn’t a one-size-fits-all solution for managing CPU usage. Different programs and situations may require different approaches. Task Manager and Resource Monitor are useful tools for basic management, while third-party applications like BES and CPULimit offer more advanced control. Additionally, exploring the program’s internal settings can sometimes provide a straightforward solution.
By experimenting with these methods, I was able to regain control over my system’s CPU resources and ensure that my computer remained responsive and efficient. The experience taught me a lot about the various ways to manage and optimize CPU usage in Windows, and I hope that sharing my approach will help others facing similar challenges.