I recently found myself in a rather frustrating situation when I needed to manually install a driver on my Windows 11 system. I had purchased a new piece of hardware for my computer, but the official installation disc was missing, and the manufacturer provided only a .INF file for the driver. To make matters worse, Windows 11 seemed determined to complicate the process. I knew that manually installing a driver using a .INF file was a bit more involved than the standard installation process, but I was determined to figure it out.
The first step I took was to make sure I had the correct .INF file for the driver I wanted to install. This file contained the instructions needed by Windows to properly integrate the hardware with the operating system. The manufacturer’s website had provided this file, but I wanted to double-check that it was the latest version and compatible with Windows 11. After confirming this, I made sure to download the file to a location I could easily access, such as my desktop.
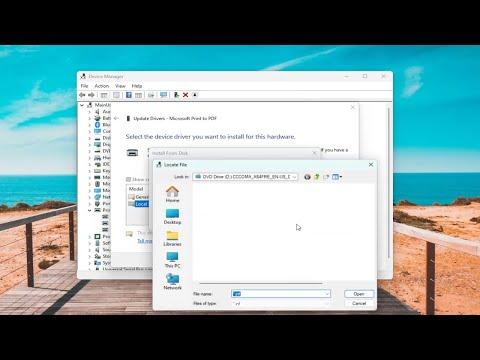
Next, I needed to access the Device Manager, a crucial tool in Windows for managing hardware devices and drivers. To open Device Manager, I right-clicked the Start button and selected “Device Manager” from the list. This opened a window that displayed all the hardware components connected to my computer.
I navigated to the category that matched the type of hardware I was installing. In my case, it was an audio device, so I expanded the “Sound, video and game controllers” section. I found the device that needed the driver update. It was listed as an unknown device or had a generic name because Windows 11 didn’t recognize it.
With the device selected, I right-clicked it and chose “Update driver” from the context menu. A dialog box appeared with options for how to search for drivers. Instead of letting Windows search automatically, I selected the “Browse my computer for drivers” option. This gave me the opportunity to specify the exact location of the .INF file.
I then clicked “Browse” and navigated to the location where I had saved the .INF file. After selecting the file, I clicked “OK” and then “Next” to begin the installation process. Windows 11 then used the .INF file to install the driver. This process involved Windows reading the instructions in the .INF file and applying them to integrate the new hardware properly.
The installation took a few moments, during which Windows might display some progress messages. After the installation was complete, Windows informed me that the driver had been successfully installed. To ensure everything was functioning correctly, I restarted my computer. Sometimes, a reboot is necessary for changes to take full effect.
After rebooting, I went back to Device Manager to verify that the new driver was properly installed. The previously unknown device now had a specific name and was listed correctly under its category. I also checked the functionality of the new hardware to ensure that it was operating as expected.
Throughout this process, I encountered a few issues. Occasionally, Windows 11 would present warnings about the driver not being signed or potentially being incompatible. In these cases, I had to bypass these warnings by providing confirmation and allowing the installation to proceed. I found that Windows 11 sometimes needed a bit of convincing to accept the manually installed driver, but patience and careful following of the prompts resolved these issues.
In conclusion, manually installing a driver using a .INF file on Windows 11, while more involved than the typical automatic installation process, is definitely manageable. The key steps involve downloading the correct .INF file, using Device Manager to locate and update the driver manually, and navigating any potential warnings or compatibility issues that arise. With these steps, I was able to successfully install my new hardware and get everything running smoothly.