I never imagined that a seemingly simple task would turn into such a challenge. My journey began when I decided to partition my C drive on Windows 11 to better organize my files and optimize system performance. I had read various articles suggesting that partitioning would help with managing data and improving system efficiency. I was particularly drawn to the idea of creating a dedicated partition for my important files, separate from the system files. However, the idea of formatting my drive just to create a new partition felt like overkill, and I was determined to find a way to do it without losing my existing data.
The first step in my quest was to delve into the built-in tools provided by Windows 11. I had heard that the Disk Management tool could be useful for this task, so I navigated to it through the Control Panel. As I opened the tool, I was greeted by a detailed layout of my disk drives and partitions. My C drive, which was almost full, was displayed as a single large partition. I was relieved to see that Windows 11 offered a built-in option to shrink the volume of a partition, which seemed like it could be the key to creating a new partition without formatting.
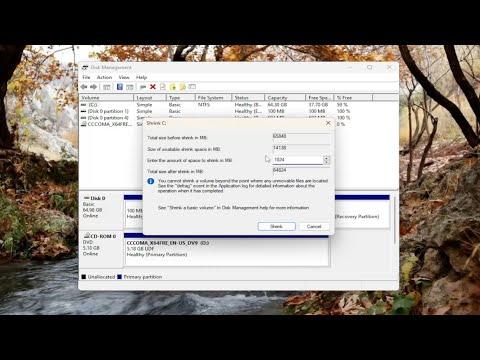
I began by right-clicking on the C drive and selecting the “Shrink Volume” option. A dialogue box appeared, showing me how much space I could potentially free up. The process was straightforward—I entered the amount of space I wanted to shrink from the C drive and clicked “Shrink.” To my dismay, the process took longer than I expected, and the amount of space that was freed up wasn’t as much as I had hoped. I realized that the space had been freed, but it was not yet allocated as a new partition.
At this point, I found myself with unallocated space on my drive but no new partition. The Disk Management tool allowed me to see this unallocated space, but I needed to create a new partition out of it. Right-clicking on the unallocated space, I selected the “New Simple Volume” option. This started the New Simple Volume Wizard, which guided me through the steps of assigning a drive letter and formatting the new partition. I was cautious to ensure that the format settings would not overwrite my existing data on the C drive.
The wizard prompted me to assign a drive letter and format the partition, but I was concerned about accidentally formatting my C drive instead. After carefully reviewing each step, I confirmed the settings and proceeded. The wizard completed the process, and I now had a new partition on my hard drive, separate from my C drive. I was relieved to see that my files remained intact and my C drive was still functioning as expected.
Reflecting on the process, I realized that partitioning a drive without formatting is indeed possible, but it requires careful attention to detail. The key takeaway from my experience was to ensure that I understood each step of the partitioning process and used the built-in tools provided by Windows 11 effectively. By shrinking the volume of the C drive and creating a new partition with the unallocated space, I was able to achieve my goal without the need for formatting and without losing any data.
In addition to the built-in tools, I also explored third-party software options to see if they could offer more features or simplify the process. There are several reputable programs available that can help manage partitions more flexibly, but I found that the built-in Disk Management tool in Windows 11 was sufficient for my needs. It’s essential to be cautious when using third-party tools and ensure that they are from trusted sources to avoid potential issues with data loss or system instability.
Ultimately, the experience taught me the importance of planning and understanding the tools at my disposal. Partitioning a drive without formatting is a manageable task if approached with care and attention. My C drive was now partitioned as I desired, and I felt a sense of accomplishment knowing that I had successfully organized my data without disrupting my existing setup.
This journey through the process of partitioning my C drive on Windows 11 reinforced the value of patience and diligence. I learned that with the right approach and careful execution, it is possible to manage and optimize my computer’s storage without resorting to more drastic measures like formatting.
