I’ve always been a bit of a stickler for organization, especially when it comes to my computer. I remember when I first upgraded to Windows 11, I was excited about the new features and refreshed look, but there was one thing that left me scratching my head. I had this folder I frequently accessed, and I wanted a quick way to get to it without having to navigate through multiple directories. Pinning folders to the Start Menu seemed like the perfect solution, but I quickly discovered that this wasn’t as straightforward as it might have been in previous versions of Windows.
One day, I was in the middle of working on a project, switching between different folders and applications. I found myself frustrated by the amount of time I was spending clicking through my file explorer to get to this one specific folder. I was convinced that Windows 11 had to have a simple way to pin folders to the Start Menu, just like how I could pin applications. After a bit of research and trial and error, I finally figured it out. Here’s how I managed to pin my folder to the Start Menu in Windows 11.
The first step involved creating a shortcut to the folder I wanted to pin. To do this, I right-clicked on the folder in File Explorer. From the context menu that appeared, I selected “Show more options” to reveal additional choices. This was necessary because the shortcut option wasn’t visible in the primary context menu. Then, I clicked on “Create shortcut.” A prompt appeared asking if I wanted to place the shortcut on the desktop; I confirmed this by clicking “Yes.”
With the shortcut now on my desktop, the next part was to move this shortcut into a position where it could be pinned to the Start Menu. I opened the Start Menu and, at this point, I couldn’t see an option to directly pin the shortcut to the menu. This was the part that puzzled me, as I was used to more direct methods in older versions of Windows.
To bypass this obstacle, I found that I needed to use a bit of a workaround. I opened File Explorer and navigated to the folder where the shortcut was saved (on my desktop). I then clicked and dragged the shortcut to the Start Menu. Instead of immediately pinning it, this action would sometimes open the Start Menu in a way that allowed the shortcut to be placed in the menu. If this method didn’t work right away, I had to make sure the shortcut was correctly positioned in a way that the Start Menu could recognize it as a pinning candidate.
In cases where dragging the shortcut to the Start Menu didn’t work, I employed another method. I accessed the Start Menu and navigated to “All apps” where I could see a list of all installed applications. Although this wasn’t directly related to folders, I found that pinning a folder required a similar approach to pinning applications.
I right-clicked on the Start Menu, and from the options, I chose “Settings.” In the settings window, I looked for the “Personalization” section and then “Start.” Within the Start settings, there was an option for “Folders.” This area allowed me to customize which folders appeared directly on the Start Menu. Although it didn’t directly pin the folder to the Start Menu, it gave me control over which folders I could quickly access.
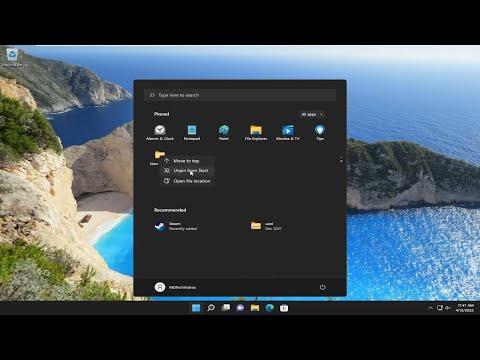
After configuring the Start Menu settings, I still had to ensure my folder shortcut was easily accessible. I navigated back to the desktop where my shortcut was placed. I right-clicked on the shortcut and selected “Pin to Start.” This was the crucial step I had missed earlier. It pinned the shortcut directly to the Start Menu, allowing me to see the folder with just one click.
In the end, I had successfully pinned my folder to the Start Menu. This not only saved me a lot of time but also made my workflow much more efficient. I found that even though Windows 11 had a slightly different process compared to previous versions, with a bit of patience and exploration, I could achieve the organization I desired.
To summarize, here’s a quick recap of the process:
-
Create a Shortcut: Right-click the folder, select “Show more options,” and then “Create shortcut.” Move the shortcut to the desktop if prompted.
-
Pin the Shortcut: Drag the shortcut from the desktop to the Start Menu. If this doesn’t work, right-click the Start Menu, go to “Settings,” then “Personalization,” and configure the “Start” settings to include folders.
-
Pin to Start: Finally, right-click the folder shortcut on the desktop and choose “Pin to Start.”
This method not only made accessing my frequently used folder quicker but also helped me get the most out of Windows 11’s new features. If you’re in a similar situation, hopefully, this guide helps streamline your process just as it did for me.