Removing extensions in Microsoft Edge is a straightforward process that can help you streamline your browser experience. Here’s how I went about it, step by step.
Firstly, I opened Microsoft Edge on my computer. This is where all the magic begins, as you need to be inside the browser to manage your extensions. I located the three horizontal dots in the upper right corner of the Edge window. These dots, often referred to as the “Settings and More” menu, are crucial for accessing the various settings and features within Edge.
Clicking on these dots, I saw a drop-down menu appear. From this menu, I selected “Extensions,” which took me to the Extensions page. This page lists all the extensions that are currently installed in my browser. Extensions are small software programs that add specific capabilities to the browser, but sometimes you might find that you no longer need or want a particular one.
On the Extensions page, I saw a list of all the extensions I had installed. Each extension had its own box with a brief description and some options. To remove an extension, I first had to find the one I wanted to get rid of. This was fairly easy since each extension was listed clearly with its name and icon. I scrolled through the list until I found the extension that I no longer needed.
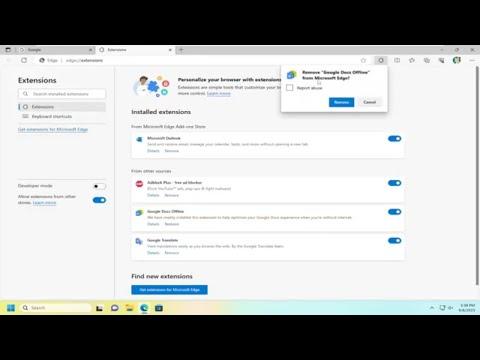
Once I identified the extension to remove, I clicked on the “Remove” button associated with it. This button was typically located on the extension’s box on the Extensions page. A confirmation dialog then appeared on my screen, asking me to confirm that I wanted to remove the extension. This step is crucial because it ensures that I didn’t accidentally remove an extension that I might still want to keep.
I confirmed the removal by clicking “Remove” on the dialog. The extension was then uninstalled from Microsoft Edge. This process was quick and efficient, usually taking only a few seconds. After removing the extension, I noticed that it was no longer listed on the Extensions page, confirming that it had been successfully removed.
In some cases, if an extension was particularly complex or had multiple components, there might be additional steps involved. However, for most standard extensions, the removal process was straightforward as described.
Additionally, if I wanted to manage my extensions more comprehensively, I could access further settings and options. By clicking on the gear icon next to an extension (if available), I could adjust its settings or disable it without completely removing it. This was useful for when I wasn’t sure if I wanted to permanently delete an extension but needed to deactivate it temporarily.
If, for any reason, I had trouble removing an extension through the standard method, I could always try clearing my browser’s cache and cookies. Sometimes, extensions might leave residual data that could interfere with the removal process. Clearing the cache and cookies could resolve such issues and ensure a clean removal.
Overall, removing extensions from Microsoft Edge is a simple task that involves navigating to the Extensions page, selecting the extension I wish to remove, and confirming the removal. This process helps keep my browser clean and ensures that I only have the extensions that are useful to me. It also contributes to better browser performance and security, as unnecessary extensions can sometimes cause conflicts or slow down the browser.
By following these steps, I was able to efficiently manage my extensions and maintain a streamlined browsing experience. Whether I wanted to remove a rarely used extension or eliminate a problematic one, the process was clear and easy to execute. This straightforward approach to managing extensions is one of the many ways Microsoft Edge allows users to customize their browsing experience according to their needs.
