I remember the day I first encountered the issue of setting a default GPU for specific applications on my Windows 11 system. It was an ordinary afternoon when I decided to do some heavy gaming and video editing. As usual, I launched my favorite editing software, but to my dismay, the performance was far from satisfactory. The application was sluggish, and it seemed like my powerful GPU wasn’t being utilized to its full potential. Instead, my laptop’s integrated graphics were handling the load. This wasn’t the experience I was expecting, and I quickly realized that my system wasn’t using the dedicated GPU I had for such demanding tasks.
At first, I thought it was just a minor glitch or an issue with the software itself. I restarted my computer, updated my drivers, and even reinstalled the application, but the problem persisted. My frustration grew as I delved deeper into forums and tech support channels, trying to find a solution. That’s when I discovered that Windows 11 has a feature that allows you to set default GPUs for individual applications. This revelation was both a relief and a challenge. I was relieved to find a potential fix, but I knew I had to navigate through the settings and understand how to use this feature effectively.
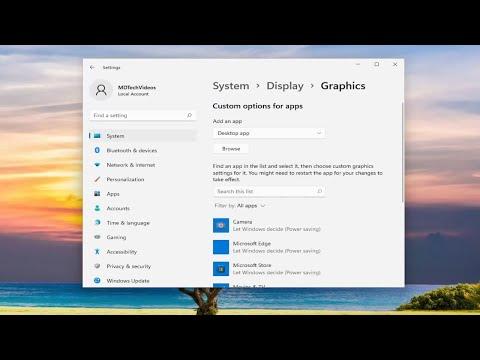
The first step in addressing the issue was to access the Graphics Settings in Windows 11. To do this, I opened the Settings app by pressing the Windows key + I on my keyboard. Once in the Settings menu, I navigated to the “System” category and then selected “Display.” At the bottom of the Display settings, I found a link labeled “Graphics.” Clicking on this link opened the Graphics settings window, which was where the magic was supposed to happen.
In the Graphics settings window, I saw an option to “Browse” for applications that I wanted to configure. This feature allowed me to add specific applications to the list and then assign a preferred GPU to each one. I started by clicking the “Browse” button and navigating to the installation directory of my video editing software. After selecting the executable file, the application was added to the list.
Once the application was added, I clicked on it to see additional options. I was presented with three choices for setting the GPU: “System default,” “Power saving,” and “High performance.” The “System default” option would let Windows decide which GPU to use based on the application’s needs, while the “Power saving” option would use the integrated GPU to save battery life. The “High performance” option was what I needed—it would utilize my dedicated GPU for maximum performance.
I selected the “High performance” option for my video editing software, ensuring that it would use the dedicated GPU. After configuring the settings, I clicked “Save” to apply the changes. I repeated this process for other applications that required high performance, such as my gaming software and certain graphics-intensive tools. Each application was individually tailored to use the GPU that best suited its needs.
To verify that the changes were effective, I launched my video editing software and checked the GPU usage. I was pleased to see that the dedicated GPU was indeed being utilized. The performance of the application improved significantly, and I no longer experienced the sluggish behavior that had frustrated me earlier. The same result was observed with my gaming applications—the graphics were sharper, and the gameplay was smoother.
While this solution worked wonders for me, I also realized that Windows 11 provides additional flexibility in managing GPU preferences. For applications that I didn’t want to manually configure, I could rely on the system’s default settings. Windows 11 automatically optimizes GPU usage for most applications, balancing performance and power consumption based on the current workload. However, for specialized tasks that require a specific GPU, the manual configuration method was invaluable.
Over time, I became accustomed to adjusting GPU settings for various applications. It became a routine part of my system maintenance, ensuring that my GPU resources were allocated efficiently. Whenever I installed new software or updated existing ones, I would revisit the Graphics settings to verify or adjust the GPU preferences as needed.
In conclusion, encountering issues with GPU usage on Windows 11 can be frustrating, but the operating system offers a straightforward solution through its Graphics settings. By following a few simple steps, you can assign specific GPUs to individual applications, optimizing performance for demanding tasks. For me, this feature was a game-changer, transforming my computing experience and allowing me to fully leverage the capabilities of my hardware. If you find yourself in a similar situation, don’t hesitate to explore these settings and make the necessary adjustments. It’s a small effort that can yield significant improvements in your system’s performance and efficiency.