I recently found myself grappling with an issue that I hadn’t anticipated. My work environment had transitioned to Windows 11, and while I was familiar with the basics of the new operating system, I quickly discovered that managing disk space was going to be a bit more challenging than I had anticipated. As someone who frequently deals with large amounts of data, I needed a way to manage disk usage effectively. The situation was becoming urgent as I was noticing that my colleagues were running out of space on their drives, leading to frustration and potential productivity losses. I realized that setting disk quotas for users could be the solution I needed.
The process of setting disk quotas in Windows 11 is not immediately obvious, especially if you haven’t dealt with disk quotas before. Here’s a detailed step-by-step guide on how I tackled this problem and set up disk quotas for users on my Windows 11 system.
First, I made sure to log in to my computer with an account that had administrative privileges. Disk quota management requires administrative rights, so this step was crucial. I navigated to the File Explorer and selected the drive where I wanted to set the quotas. In my case, this was the C: drive, but the process is similar for any drive.
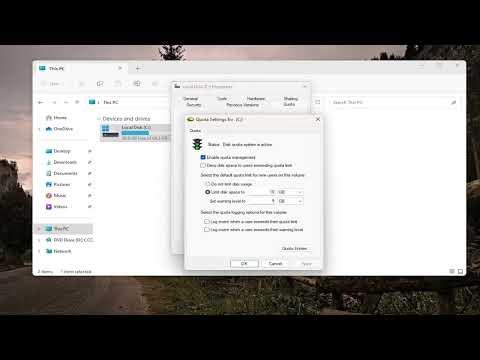
Right-clicking on the drive, I chose ‘Properties’ from the context menu. This opened a new window with various tabs. I clicked on the ‘Quota’ tab, which is where the disk quota settings are managed. If I didn’t see this tab, it meant that the quota management feature was not enabled, and I would have to turn it on.
To enable quota management, I clicked on the ‘Show Quota Settings’ button. In the Quota Settings window, I checked the box labeled ‘Enable quota management’. This was the first step to ensure that the system would track disk usage and enforce quotas. I also checked the option ‘Limit disk space to’ and set a specific limit for the amount of space that users could consume on this drive. I chose a reasonable limit based on the size of the drive and the average usage patterns of the users.
Next, I enabled the option ‘Generate a warning event when users exceed their quota limit’. This was important because I wanted to be alerted if users were approaching or exceeding their quotas, which would give me a chance to address the issue before it became critical. I set the warning threshold to be a bit lower than the quota limit to give users ample notice.
After configuring these settings, I applied the changes and returned to the main Properties window. From there, I clicked on the ‘Quota Entries’ button, which opened a list of current quota entries. This list was initially empty because no users had been assigned quotas yet.
To add quota entries for specific users, I clicked on the ‘Quota’ menu and selected ‘New Quota Entry’. In the window that appeared, I could specify the users or groups that I wanted to set quotas for. I typed in the usernames of the individuals or groups and then set individual quota limits and warning levels as needed. It was important to tailor these settings based on each user’s needs and the role they played within the organization.
Once I had configured the quotas for all necessary users, I reviewed the settings to ensure everything was correct. I made sure that each user had an appropriate limit and that the warning levels were set to provide adequate notice. I also checked that the quota settings were applied to the appropriate folders and drives.
With the quotas set, I monitored the system to see how users were managing their disk space. I kept an eye on the notifications and warnings generated by the quota management system. This allowed me to proactively address any issues that arose, such as users needing additional space or having to clear out old files.
One of the challenges I faced was ensuring that users understood why their quotas were being enforced and how they could manage their disk space effectively. To address this, I communicated with my colleagues about the new quota system, explaining its purpose and how it would help in managing overall disk space better. I provided guidelines on how to monitor their own disk usage and offered assistance if they encountered any problems.
Overall, setting disk quotas in Windows 11 proved to be a valuable tool for managing disk space. It allowed me to keep track of disk usage and prevent any one user from consuming excessive amounts of space. By configuring quotas, I was able to maintain a more organized and efficient work environment, ensuring that everyone had the resources they needed without the risk of running out of space.
In conclusion, managing disk quotas on Windows 11 might not be something that everyone thinks about initially, but it is an important aspect of maintaining an efficient and organized system. By following these steps and carefully setting quotas, I was able to address a pressing issue and improve the overall management of disk space within my work environment.
