I remember the first time I decided to dive into the world of online gaming and streaming on Steam. I had always enjoyed video games, but it wasn’t until recently that I considered sharing my gaming experiences with others. Naturally, I wanted to set up my microphone to ensure that my friends could hear me clearly during our gaming sessions. Little did I know that setting up a microphone on Steam could be a bit more complicated than I initially thought.
It all started one evening when I had just finished setting up my new gaming rig. Everything was in place: my high-definition monitor, my gaming keyboard, my sleek mouse, and of course, my new microphone. I was excited to start using it for both in-game communication and for streaming my gameplay. I plugged the microphone into my computer, only to realize that I couldn’t get it to work correctly on Steam. I could hear my friends just fine, but they couldn’t hear me. It was frustrating, to say the least.
First, I tried checking the microphone connections and made sure everything was plugged in correctly. I verified that the microphone was properly connected to the right port and that there were no loose cables. Everything seemed to be in order on that front. Next, I checked my computer’s audio settings. I went into the Control Panel and navigated to the Sound settings. Here, I could see that my microphone was detected, but the levels were too low, and the device wasn’t set as the default recording device.
I decided to adjust the microphone settings in the Control Panel. I clicked on the “Recording” tab and saw my microphone listed there. I right-clicked on it and selected “Properties.” In the Properties window, I went to the “Levels” tab and increased the microphone volume to a higher level. I also made sure that the microphone was enabled and set as the default device. After applying these changes, I tested the microphone using the “Listen” feature to ensure it was working correctly.
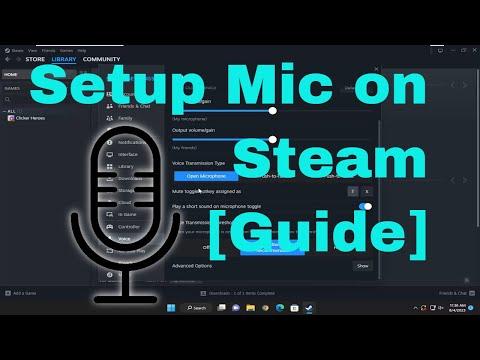
Having done all that, I thought I was ready to tackle the problem on Steam. I launched the Steam client and went to the settings menu. In the settings, I navigated to the “Voice” tab. Here, I needed to configure the microphone settings specific to Steam. The first thing I did was select the correct microphone from the dropdown menu under the “Microphone” section. I ensured that my new microphone was selected and not any other device.
I then checked the voice settings to make sure they were configured properly. I adjusted the input volume and sensitivity settings to ensure that my voice would be picked up clearly without too much background noise. Steam has an in-built microphone testing feature, which was incredibly helpful. I used this feature to test how my voice sounded through the microphone and made further adjustments based on the feedback.
Despite these adjustments, I was still experiencing issues. My friends could hear occasional crackling noises and background static. I realized that the problem might be due to my microphone settings or potential interference. I decided to explore additional software that could help me manage my microphone settings better. I installed a popular audio management application that allowed for more detailed control over audio inputs and outputs. With this software, I fine-tuned my microphone settings even further.
One crucial feature of the audio management software was the noise gate and equalizer settings. I adjusted the noise gate to filter out any unwanted background noise and used the equalizer to enhance the clarity of my voice. These adjustments significantly improved the overall sound quality. I also made sure that there were no other applications running that could potentially interfere with my microphone input.
After making these changes, I returned to Steam and tested the microphone again with my friends. This time, the clarity was much better, and there were no more crackling noises. It was a relief to see that all my efforts had paid off. My friends were now able to hear me clearly, and I could fully enjoy my gaming sessions and streaming without any further issues.
Looking back, I realized that setting up a microphone on Steam required a bit more effort than I initially anticipated. It wasn’t just about plugging in the microphone but also configuring both the system and Steam settings to ensure everything was working harmoniously. The combination of adjusting system audio settings, configuring Steam’s voice settings, and using additional software for fine-tuning made all the difference.
I also learned that it’s important to be patient and methodical when dealing with technical issues. Sometimes, resolving these problems involves multiple steps and adjustments. In the end, the satisfaction of having everything set up correctly and being able to communicate effectively with friends was well worth the effort.
If you’re facing similar issues, I’d recommend following these steps: start by checking your microphone connections and system audio settings. Then, configure the microphone settings in Steam and use any available testing features to ensure everything is working properly. If necessary, consider using additional software to fine-tune your audio settings. With a bit of patience and persistence, you’ll likely find that your microphone setup will be up and running smoothly in no time.