When working with Windows 11, managing services is an essential skill for maintaining system performance and troubleshooting issues. Services are background processes that perform various functions necessary for the operating system and applications. Knowing how to start, stop, and restart these services can help you manage system resources more effectively and resolve problems quickly.
Starting a service in Windows 11 is a straightforward process. First, you’ll need to open the Services application, which is where you can manage all the services running on your computer. To do this, you can use the Run dialog box or search for the Services app in the Start menu. Press `Windows + R` to open the Run dialog, type `services.msc`, and hit Enter. Alternatively, you can search for “Services” in the Start menu and select the Services app from the search results.
Once you have the Services window open, you’ll see a list of all the services installed on your system. The list includes the name of each service, its description, and its current status, such as whether it is running, stopped, or paused. To start a service, locate it in the list and right-click on its name. From the context menu, select “Start.” If the service is already running, you won’t see the Start option, but you can choose “Restart” if needed.
When starting a service, Windows may prompt you for administrative privileges. If so, you’ll need to click “Yes” to allow the action. After you start the service, its status will change from “Stopped” to “Running,” indicating that it is now active and performing its designated functions.
Stopping a service is similar to starting one, but it’s crucial to be cautious when doing this because some services are essential for the proper functioning of the system or applications. To stop a service, open the Services window as described earlier, locate the service you want to stop, right-click on it, and select “Stop” from the context menu. The status of the service will change to “Stopped” once the action is complete.
If you are unable to stop a service, it may be because it is critical for system operations or because it is currently in use by another process. In such cases, you might need to close related applications or processes before stopping the service.
Restarting a service is sometimes necessary when you’re troubleshooting issues or when a service needs to be refreshed. To restart a service, follow the same steps to open the Services window. Find the service you want to restart, right-click on its name, and select “Restart.” This action will stop the service and then immediately start it again, which can help resolve issues caused by temporary glitches or errors.
In addition to using the Services window, there are other methods to manage services, such as using the Command Prompt or PowerShell. These methods can be useful for scripting or automating tasks related to service management.
To start, stop, or restart a service using Command Prompt, you’ll need to open it with administrative privileges. Search for “Command Prompt” in the Start menu, right-click on it, and select “Run as administrator.” In the Command Prompt window, you can use the `net` command to manage services. For example, to start a service, you would use the command `net start
PowerShell offers more advanced capabilities for managing services. To use PowerShell, search for “PowerShell” in the Start menu, right-click on it, and select “Run as administrator.” Once you have the PowerShell window open, you can use cmdlets to manage services. For example, `Start-Service -Name
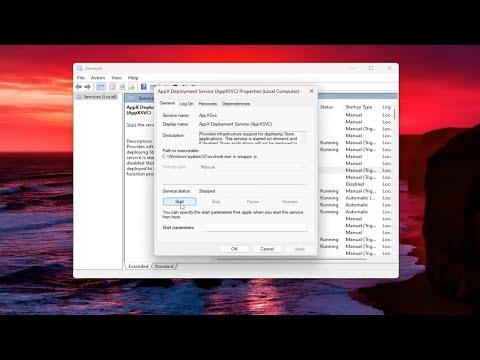
In some cases, managing services may require additional configuration, such as changing their startup type or modifying their settings. Services can be configured to start automatically when Windows boots up, start manually when needed, or be disabled entirely. To change the startup type of a service, open the Services window, right-click on the service, and select “Properties.” In the Properties window, you’ll find a drop-down menu under “Startup type” where you can select the desired option: Automatic, Manual, or Disabled. After making changes, click “Apply” and then “OK” to save them.
It’s important to be cautious when managing services, especially when making changes to critical system services. Stopping or disabling essential services can lead to system instability or cause certain features to stop working. Always make sure you understand the purpose of a service and its impact on the system before making any changes.
By mastering these basic service management tasks—starting, stopping, and restarting services—you can improve your ability to maintain and troubleshoot your Windows 11 system. Whether you’re a casual user looking to resolve a specific issue or an IT professional managing multiple machines, these skills will be valuable for keeping your system running smoothly.