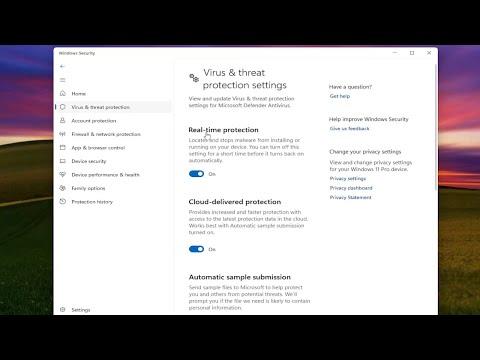
I found myself grappling with an unexpected challenge one day while working on my Windows 11 PC. I had been troubleshooting an issue with a particular piece of software that seemed to be clashing with Windows Security’s real-time protection. Despite my best efforts, the software wasn’t functioning correctly, and I began to suspect that Windows Security might be the culprit. I needed to temporarily disable the real-time protection feature to test whether it was indeed the cause of the problem.
First, I decided to delve into Windows 11’s security settings. I navigated to the Start menu and clicked on the gear icon to open the Settings app. From there, I selected “Privacy & Security,” which led me to a series of options related to the system’s privacy and security features. I was on a mission to locate the exact setting that controlled real-time protection, and I knew that this would be nestled within the Windows Security interface.
I clicked on “Windows Security” to open the security settings, which took me to a new window with several tabs on the left side. The tab I was interested in was labeled “Virus & Threat Protection.” This section provided a comprehensive view of the current status of my virus and threat protection, including real-time protection, cloud-delivered protection, and more.
Under the “Virus & Threat Protection” settings, I noticed a link that read “Manage settings” under the “Virus & Threat Protection Settings” heading. I clicked on this link to access the more detailed settings for real-time protection.
Here, I saw a toggle switch for “Real-time protection.” This feature was currently turned on, as indicated by the switch being in the ‘On’ position. To disable real-time protection, I clicked the switch, and a prompt appeared asking me to confirm my choice. I acknowledged the prompt, and within moments, real-time protection was turned off.
I was now ready to test my software. With real-time protection disabled, I ran the application again, and this time, it operated without any hitches. This confirmed that Windows Security’s real-time protection was indeed interfering with the software. However, I knew that turning off real-time protection left my system vulnerable to potential threats, so I needed to remember to re-enable it as soon as my testing was complete.
After completing my tests and resolving the issues with the software, I returned to the Windows Security settings to turn real-time protection back on. I followed the same steps: navigating to the “Virus & Threat Protection” section, clicking on “Manage settings,” and toggling the “Real-time protection” switch back to the ‘On’ position. This reactivated the real-time protection feature, ensuring that my system was once again safeguarded against potential threats.
Throughout this process, I made sure to be cautious. Disabling real-time protection, even temporarily, can leave a system exposed to various risks. Therefore, it was crucial to only disable it for as long as absolutely necessary and to promptly restore the protection once the task at hand was completed.
This experience was a reminder of the delicate balance between troubleshooting software issues and maintaining system security. While it was essential to disable real-time protection to address certain compatibility issues, I had to be mindful of the potential risks involved. By carefully following the steps to turn off and then re-enable the protection, I managed to navigate this challenge without compromising the overall security of my Windows 11 PC.
In the end, this small but significant adjustment in settings allowed me to get my software working correctly while ensuring that my system remained secure once the issue was resolved.
