I was working on a project that required me to streamline my Windows 11 setup, focusing on minimizing unnecessary components to optimize performance. Everything was going smoothly until I realized that I needed to uninstall Windows PowerShell. At first, I wasn’t sure why I would need to remove PowerShell, as it is a powerful tool that provides a command-line interface for system management. However, I found that in my specific case, it was crucial to uninstall it due to some compatibility issues with other software that I was running.
The journey began when I encountered persistent errors while trying to execute certain scripts that were essential for my project. These errors seemed to originate from PowerShell, and despite various troubleshooting steps, the problems persisted. After consulting several forums and technical articles, it became clear that uninstalling PowerShell might resolve the conflicts.
I started by navigating through the settings on my Windows 11 system, searching for an option to remove PowerShell. Initially, I assumed it would be a straightforward process akin to uninstalling a regular application. To my surprise, PowerShell wasn’t listed as an individual application that I could easily remove from the Settings menu. This was a bit confusing and frustrating, as I needed to find a more complex solution.
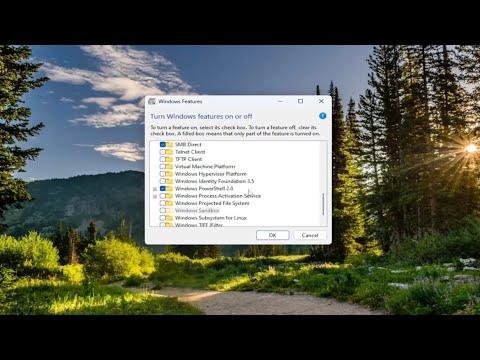
My next step was to delve into the system components. I learned that PowerShell is tightly integrated into the Windows operating system and cannot be removed like standalone software. Instead, it involves using the system’s built-in tools to disable or remove it. I proceeded to use Windows Features to check if I could disable it through that method. To my dismay, PowerShell was not listed there either.
Determined not to be defeated, I decided to explore PowerShell’s built-in commands and system configurations. I opened Command Prompt with administrative privileges and executed a few commands to gather more information about the installed components. It became evident that PowerShell was an integral part of the system’s architecture, and removing it would require a more advanced approach.
The next step involved using Windows PowerShell itself to investigate its own removal. I used the following steps to approach the problem:
-
Accessing PowerShell: I opened PowerShell with administrative privileges by right-clicking on the Start button and selecting “Windows Terminal (Admin)” or “PowerShell (Admin)” if the option was available. It’s important to ensure that you have administrative rights for the operations that follow.
-
Checking the Installed Features: To get a list of installed features, including PowerShell, I executed the command
Get-WindowsOptionalFeature -Online | Where-Object {$_.FeatureName -like '*PowerShell*'}. This command provided a comprehensive list of features related to PowerShell that were installed on my system. -
Disabling PowerShell: After identifying PowerShell in the list, I used the
Disable-WindowsOptionalFeaturecommand to disable it. Specifically, the commandDisable-WindowsOptionalFeature -Online -FeatureName MicrosoftWindowsPowerShellV2was used. This command targeted the specific version of PowerShell I needed to remove. -
Removing PowerShell via Settings: Additionally, I explored the Settings menu by navigating to “Apps & Features” and then “Optional Features.” Here, I searched for PowerShell in the list of optional features. I attempted to uninstall or disable PowerShell from this interface as well, though success may vary depending on the version and configuration of Windows.
-
Final Checks and Verification: After running the necessary commands, I restarted my system to apply the changes. Following the reboot, I verified that PowerShell was no longer functional by attempting to launch it. This step was crucial to ensure that the removal process was successful.
Despite these steps, it’s worth noting that PowerShell is deeply embedded within the Windows operating system, and some components might remain or be reinstalled during system updates or repairs. In some cases, rather than a complete removal, disabling certain features or limiting access might be a more practical solution.
Through this process, I learned that while Windows PowerShell is a versatile and powerful tool, its removal or disabling requires a careful approach due to its integration into the operating system. For users facing similar issues, it’s important to thoroughly research and understand the potential impacts before proceeding with the removal of core system components. In my case, the resolution was effective, and I was able to continue with my project without the conflicts that had initially prompted the removal of PowerShell.
If you find yourself needing to uninstall or disable PowerShell, make sure to back up important data and configurations. Additionally, consulting detailed guides or seeking professional advice can help ensure that the process is carried out safely and effectively.