When I decided to manage all my email accounts more efficiently, I turned to Gmail because of its robust features and user-friendly interface. I was juggling several email addresses for different purposes: one for personal communication, another for work, and a few for various subscriptions and services. Switching between these accounts and checking each one individually was becoming cumbersome. I needed a solution to streamline my email management, and that’s when I discovered that Gmail allows you to check mail from other accounts, which turned out to be a game-changer for me.
First, I logged into my primary Gmail account. This is the account where I wanted to centralize all my email checking. Once logged in, I navigated to the settings by clicking on the gear icon in the upper right corner of the Gmail interface. From there, I selected “See all settings” to access the full range of options Gmail offers.
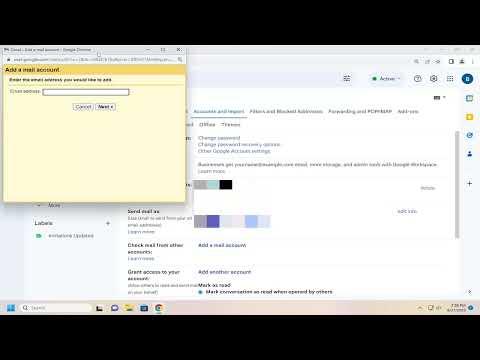
In the settings menu, I clicked on the “Accounts and Import” tab. This section is crucial because it allows you to manage various aspects of how Gmail interacts with other email accounts. Under this tab, I found the “Check mail from other accounts” section. This feature lets you add other email addresses so Gmail can retrieve messages from those accounts and display them in my Gmail inbox.
I clicked on “Add a mail account” to start the process. A new window popped up asking me to enter the email address of the account I wanted to add. I typed in the email address of the account I wanted to manage within Gmail and clicked “Next.”
The next screen prompted me to choose between two options: “Import emails from my other account (POP3)” and “Link accounts with Gmailify.” Since I wanted to retrieve emails from an account that supported POP3 (Post Office Protocol version 3), I selected the first option. If the account I was adding supported Gmailify, which integrates the account more seamlessly with Gmail, I might have chosen that option instead, but for now, POP3 was the right choice.
After selecting POP3, I was required to enter additional information about the account I was adding. This included the username, which is typically the full email address, and the password for that account. Additionally, I had to provide the POP server details. For most email providers, this information can be found in their support documentation or settings page. I entered the server information for the email provider and ensured that the correct port number was also specified.
Gmail also offered some additional options on this screen. I could choose to leave a copy of retrieved messages on the server, which is useful if I wanted to access the emails from other devices or email clients later. There was also an option to label incoming messages so I could easily identify which emails came from the added account. I decided to use this option to keep things organized. Lastly, I could choose to archive incoming messages directly, which would keep my inbox uncluttered.
Once I filled in all the required fields and selected my preferences, I clicked “Add Account.” Gmail then attempted to connect to the email account and retrieve some test messages to ensure everything was set up correctly. This process took a few moments, but soon I received a confirmation that my account had been added successfully. Gmail also gave me the option to send emails using this newly added address. I decided to enable this feature so I could manage all my email communications from a single place.
Now, whenever I checked my Gmail inbox, I saw messages from all the accounts I had added, neatly organized according to the labels I had set. This feature saved me a lot of time and effort, as I no longer needed to log in to multiple email accounts or use different email clients. Instead, everything was consolidated into one streamlined interface.
Additionally, I found that Gmail’s powerful search capabilities made finding specific emails across all accounts easier. By using keywords and filters, I could quickly locate messages regardless of which account they originated from. This enhanced my productivity and helped me stay on top of my correspondence more effectively.
If I ever needed to remove an account or adjust settings, I could easily do so by going back to the “Accounts and Import” tab in Gmail settings. There, I had the option to delete an account or modify the existing settings, such as changing the POP server details or updating my password.
Overall, using Gmail to check mail from other accounts has significantly simplified my email management. By consolidating all my emails into a single interface, I’ve been able to streamline my workflow and reduce the time I spend managing multiple accounts. This feature is a testament to Gmail’s flexibility and usefulness, making it a valuable tool for anyone with multiple email addresses.
